
In this comprehensive 2026 guide, we’ll walk you through how to choose the right parts for your gaming PC—and how to verify that every component will work with the rest of your build.

You’ve decided to build your own gaming PC. It’s now time to pick parts for your system. In this guide, we’ll cover everything you need to know in order to choose the right components for your needs and budget.
This guide is over 17,000 words long. It covers every step of choosing the right parts for a PC build, including the parts you’ll need, the compatibility and clearance issues you must check, and how much of your budget you should allocate to each component.
We’ve tried to provide as many real-world examples as possible to help you understand what goes into choosing components.
By the end of this guide, you’ll be ready to create a balanced part list and verify it against the exact specifications, support lists, and manuals for the components you intend to buy.
Here’s a breakdown of the topics we’ll discuss:
Bookmark this page: This guide is a lot to digest. Consider bookmarking it so you can come back to continue reading or to use as a reference when you start choosing parts for your build.
I. Budget & Performance Requirements
The first thing you’ll need to do is determine exactly what kind of system you want to put together. The kind of system you build will be determined by two factors:
- How much money you have to spend
- What types of games you play
Obviously, the more money you have to spend, the better the PC you can build.
The more demanding the games you play are, the more powerful your system will need to be, and, as a result, the more money you’ll need to spend.
Let’s look at some examples of common use cases to give you an idea of why your budget and what games you play will matter when choosing components:
Example #1: Extreme 4K Performance
Goals: Play a demanding game at 4K with maximum or near-maximum settings
Budget: Flexible
Let’s say you want to play a demanding title such as Black Myth: Wukong on a 4K high-refresh-rate monitor. You want excellent image quality, ray tracing, and enough performance to keep the experience smooth.
At 4K, the graphics card will usually be the main performance constraint. In 2026, NVIDIA’s GeForce RTX 50-series sits at the top of its gaming lineup, with the RTX 5090 as the flagship. AMD’s current Radeon RX 9000-series covers several mainstream and high-performance targets.
However, even a flagship GPU does not guarantee high native-resolution frame rates with every effect enabled. Path tracing and other extreme settings may still require upscaling, frame generation, or a reduction in image-quality settings. When you compare benchmarks, check whether the result is native, upscaled, or using generated frames; those are different workloads and experiences.
You also need to research the exact graphics-card model. NVIDIA’s Founders Edition and cards from ASUS, Gigabyte, MSI, PNY, Zotac, and other partners can differ in length, thickness, power limits, connectors, and recommended PSU capacity even when they use the same GPU.
That makes a fixed price estimate unreliable. Flagship-card pricing and availability can move dramatically, and partner models can cost much more than their original launch prices. Price the exact GPU first, then leave enough room for a suitable CPU, a well-built power supply, adequate cooling, and a case that can physically hold the card.
For a build like this, the GPU will receive the largest share of the budget, but the rest of the system still has to be chosen around its power and clearance requirements.
Example #2: High FPS for Competitive Gaming
Goals: Play competitive titles at 1080p on a high-refresh-rate monitor
Budget: Moderate
Perhaps you’re particularly good at a competitive title like Valorant. You’re looking for every advantage possible, and you’ve decided that a 1080p 360Hz monitor will give you a smoother and more responsive experience.
You’ve already ordered the monitor. Now you need a PC that can produce a very high frame rate without severe dips.
Do you need to buy the most expensive graphics card available?
No. Competitive games are often run at reduced settings, and they can become limited by CPU performance long before a flagship GPU is fully utilized. For this use case, a balanced mid-range GPU paired with a fast gaming CPU may be a better use of money than an extreme GPU paired with a weak processor.
Recent per-game benchmarks are essential. Look at average frame rate, 1% lows, test settings, and the CPU and memory used in the benchmark. An average above 300 FPS is less useful if frame pacing is inconsistent or the frame rate repeatedly falls well below the monitor’s refresh rate.
A current $1,000 gaming PC build is a sensible place to start, but the least expensive build that meets your target will depend on the exact game. Less demanding esports titles can run well on considerably cheaper hardware; more CPU-heavy competitive games may justify a larger CPU allocation.
You can always spend more, but for this use case, spending more on the GPU is not automatically the best decision.
Example #3: 1080p Budget Gaming
Goals: Get into PC gaming
Budget: $500
All your friends game together on PC. Sometimes they play Minecraft, League of Legends, or Rocket League, and sometimes they play Fortnite.
You want to join them, but you need a computer and have a limited budget. A friend has an older 1080p monitor, keyboard, and mouse that you can use, so the entire $500 can go toward the tower.
Can a $500 budget accomplish your goal in 2026?
It can, but current component pricing and availability will determine whether a new-parts build is worthwhile at the moment you buy. You may need to accept lower settings, use integrated graphics temporarily, shop sales, or purchase a carefully inspected used graphics card.
A current $500 PC build can show you what is realistic right now. Do not copy an old list whose prices have changed: a configuration that once totaled $500 can become poor value when one component goes out of stock.
At this budget, prioritize a functional and upgradeable system. Avoid a no-name power supply, a single tiny storage drive, or a motherboard that blocks a sensible future upgrade merely to fit a slightly faster GPU today.
For Minecraft, League of Legends, Rocket League, and similar games, modest hardware can still provide a good experience. Fortnite and newer AAA releases are more demanding, so expect to use lower settings and upscaling where available.
The used market can stretch the budget further, especially for the GPU and case. Be more cautious with used motherboards and storage, and generally buy the PSU new unless you can verify its exact model, age, condition, cables, and warranty.
So, a $500 budget can get you into PC gaming, but it requires more flexibility and more careful price checking than a higher-budget build.
Turn Your Goal Into a Testable Performance Target
“I want a fast gaming PC” is too vague to guide a parts list. Before comparing products, write down:
- the games you play most often;
- the monitor’s resolution and refresh rate;
- the image-quality settings you care about;
- whether you are willing to use upscaling or frame generation;
- any streaming, editing, development, or school/work applications; and
- the total budget for the tower, operating system, monitor, and peripherals.
Then translate those preferences into a target such as, “I want at least 60 FPS in demanding single-player games at 4K High using quality-mode upscaling,” or, “I want 240 FPS with strong 1% lows in Valorant at 1080p competitive settings.” This makes benchmark research much more useful.
How to Read Benchmarks Without Choosing the Wrong Part
A benchmark applies only to its test conditions. Check the CPU, GPU, memory, driver, game version, map or built-in test, graphics preset, ray-tracing setting, and upscaling mode. A result labeled “4K Ultra” may use native rendering on one site and an upscaler on another.
Average FPS is not the entire experience. The 1% low is a useful indicator of recurring dips, and a frame-time plot can reveal stutter that an average hides. For competitive play, latency and frame consistency matter alongside the average. For single-player games, a stable lower frame rate with good image quality may be preferable to a much higher generated-frame counter.
Frame generation can improve visual smoothness, but it does not replace the need for an adequate base frame rate. Generated frames also should not be treated as equivalent to traditionally rendered frames in latency-sensitive comparisons. Compare native rendering, upscaling, and frame generation separately.
Plan Around the Monitor You Actually Have
There is little value in paying for 4K performance when you will keep a 1080p display for years, and a high-refresh monitor is wasted if the chosen games and hardware cannot approach its useful range. Conversely, a monitor upgrade can be one of the most visible improvements to a capable system.
Confirm that the graphics card and monitor share the connection and feature support you need, including the required DisplayPort or HDMI mode, variable refresh rate, resolution, refresh rate, and color depth. Cable capability matters too; a connector that fits is not proof that the cable supports the desired link speed.
Use a Budget Range, Not a Single Frozen List
PC-part prices change too quickly for a fixed percentage formula to remain optimal. Create a preferred build and a fallback for the two or three volatile components—normally the GPU, CPU, and motherboard. If the preferred GPU jumps in price, you can switch to the fallback without rebuilding the entire plan from scratch.
Set aside a small contingency for shipping, tax, an extra fan, a needed adapter, thermal paste, or a BIOS-update solution. Do not spend the entire ceiling on eight core components and then discover that the motherboard lacks Wi-Fi or the case lacks enough fans.
Important: These examples show that the parts you should choose will vary significantly depending on your budget and needs. Once you have set a budget and you know what games you want to play on your PC, you can start looking for components. Also, consider checking out the Budget Allocation section to get a rough idea of how much you should spend on each component.
II. How Much Money to Allocate to Each Component
There is no single best way to decide how much money to spend on each component. For more context, see our guide on how much it costs to build a gaming PC.
If you’re going to use your PC solely for gaming, and you’ll be playing mostly graphics-intensive games, then it makes sense to allocate more money to your GPU.
If you’re going to use your PC for some gaming, but you’ll also be using it for productivity tasks like video editing, machine learning, graphic design, content creation, etc. then you’ll want to allocate less to your GPU and more to your CPU, RAM, and storage (SSD).
Below we’ve provided a calculator that will give you a rough idea of how much you should spend on each component:
Gaming PC Build | Budget Allocation Calculator
This calculator aims to help you determine how much you should spend on each component based on your budget and use-case.
GPU Allocation
For pure gaming performance, as your budget increases, so should the amount you allocate to your GPU.
This is because once you’ve hit a certain threshold, moving to the next higher tier on your CPU, RAM, and SSD will provide minimal in-game performance gains, whereas moving to the next GPU tier will provide a noticeable increase.
The opposite is true as your budget decreases—especially into extremely tight budget ranges. You’ll need to spend less on your GPU in order to be able to fit in all necessary components.
Example Parts Lists
If you want to see what a list of compatible components for a given budget looks like, check out the following posts:
Both of these posts feature multiple parts lists that you can use as-is, or customize to your liking.
III. Parts Needed to Build a Gaming PC

In order to build a gaming PC you’ll need the following parts:
- Processor (CPU)
- CPU Cooler
- Motherboard
- Graphics Card (GPU)
- Memory (RAM)
- Storage (SSD or HDD)
- Case
- Power Supply (PSU)
We’ve put together individual How to Choose guides on all of the components you’ll need to build a PC. These are extensions to this guide. It would be a good idea to read through each of the guides linked to above. There will be some overlapping content, but reading both will give you a complete look at the component choosing process.
It’s also important to note that not all components are compatible with each other. So, you need to make sure you choose parts that will actually work together. In the next section, we’ll discuss component compatibility.
What about cables? Most required cables come with the parts you purchase, but check the package contents. The PSU supplies power cables, the case supplies its front-panel leads, and the motherboard usually supplies SATA data cables. Used parts and OEM/tray CPUs may be missing accessories. Never reuse modular PSU cables unless the PSU manufacturer explicitly lists those exact cables as compatible with the exact new PSU model.
What about additional fans? Do not assume a case includes every fan mount shown in its product images. Check the package contents. A low-power budget build may be usable with one intake and one exhaust fan, while a high-power CPU and GPU will normally benefit from more airflow. Fan quantity is only part of the equation; the case’s intake design, fan placement, and cable management also matter.
Items That Are Easy to Leave Out
The eight core components are not always the entire purchase. Check whether you also need:
- an operating-system license and installation USB drive;
- a monitor cable rated for the desired resolution and refresh rate;
- Wi-Fi or Bluetooth if the motherboard does not include them;
- a keyboard, mouse, headset, speakers, webcam, or controller;
- additional case fans, a fan hub, or PWM splitters;
- a surge protector or uninterruptible power supply; and
- a small screwdriver, cable ties, and another device for reading manuals during the build.
If the selected CPU lacks integrated graphics, the motherboard’s display outputs will not provide a picture without a discrete GPU. If it does include integrated graphics, those outputs can be extremely helpful for first-boot troubleshooting. Verify the CPU specification and the motherboard’s display-output limitations rather than assuming every processor can use the rear HDMI or DisplayPort connector.
For networking, check both the controller and the antenna/package contents. “Wi-Fi 7 ready” can mean the board has a module and antennas, but wording varies. A wired Ethernet port also has a rated speed, and achieving it requires compatible network equipment and cabling.
IV. Component Compatibility

Not every processor works with every motherboard, and not every case can hold every graphics card. A power supply can have enough wattage yet lack the correct GPU connector, and a memory kit can be the correct DDR generation yet remain unstable at its advertised profile.
In other words, compatibility is more than asking whether two parts physically connect.
PCPartPicker is an excellent first filter. It catches many socket, wattage, and form-factor conflicts, but no automated tool knows every BIOS revision, lane-sharing rule, cable bend, radiator collision, or last-minute product revision.
For this guide, we’ll use three categories:
- Hard compatibility issue: two parts cannot be connected or used together, such as an AM5 CPU and an LGA1851 motherboard.
- Physical clearance issue: the parts are electrically compatible, but one blocks another or does not fit in the case.
- Practical compatibility issue: the system can boot, but a weak power design, inadequate cooler, unstable memory profile, restricted airflow, or shared PCIe lanes prevents it from working as intended.
The safest process is to verify each component against the exact model numbers in your list:
- Use a compatibility tool to catch obvious conflicts.
- Check the CPU-support and memory-support pages for the exact motherboard model and revision.
- Read the motherboard and case manuals for slot sharing, headers, and clearance conditions.
- Check the exact GPU, cooler, and PSU specifications on their manufacturers’ websites.
- Recheck the list immediately before ordering in case a retailer has substituted a different revision.
We’ll cover CPU/motherboard compatibility, memory, cooling, case fit, storage, and power. Clearance issues are covered separately in the next major section.
1. CPU-Motherboard Compatibility

Not all CPUs will work in all motherboards. You cannot put an AMD CPU in an Intel-based motherboard (and vice-versa). Also, sometimes you cannot put an older generation CPU in a newer generation motherboard (and vice-versa) even if the newer motherboard can physically hold the older CPU.
Then there is the scenario where a certain motherboard will work with a certain CPU, but will limit the CPUs performance.
The four main things to consider when choosing a CPU and motherboard combination are:
- CPU capabilities
- CPU socket
- CPU generation
- Chipsets
Let’s discuss each below.
CPU Capabilities
We’re taking a bit of a detour here.
Before we can explain how to determine if a motherboard and CPU are compatible, you first have to understand the different options you have for a CPU.
There are a ton of different CPU options available on the market and they offer a wide range of performance and features.
In this section, we’ll discuss how you can differentiate between the different processor options currently available, which, in turn, will help you choose the right motherboard.
CPU Levels
AMD and Intel divide their consumer desktop processors into broad performance tiers. These names are useful for orientation, but they are not direct performance measurements.
Current AMD Ryzen Tiers
- Ryzen 9: high core counts and premium pricing, aimed at heavy creation, productivity, and enthusiast builds
- Ryzen 7: upper-mid-range and high-end options, including several gaming-focused X3D models
- Ryzen 5: mainstream models that often provide strong gaming value
- Ryzen 3: entry-level models, when offered in a particular generation
Current Intel Desktop Tiers
- Core Ultra 9: premium desktop performance
- Core Ultra 7: upper-mid-range and high-end performance
- Core Ultra 5: mainstream performance
Intel’s older Core i9, Core i7, Core i5, and Core i3 naming remains relevant when you compare 12th-, 13th-, and 14th-generation LGA1700 processors. Intel’s current desktop family uses the Core Ultra brand and a different model-number system.
A tier name only compares products loosely. A newer Ryzen 5 can beat an older Ryzen 7 in some games, and a Core Ultra 5 can beat an older Core i7 in some workloads. Core count, architecture, clock behavior, cache, power limits, memory, and the game itself all affect performance.
You should also avoid assuming that the top tier is automatically best for gaming. Games do not scale evenly with core count, and a gaming-focused processor with additional cache can outperform a more expensive productivity-oriented chip in some titles.
Finally, not every AMD processor should be described as freely overclockable in the same way. Overclocking controls and limits vary by CPU family, model, chipset, BIOS, and warranty terms. Treat the exact processor specification—not a blanket brand rule—as authoritative.
CPU Series/Model
After identifying a broad tier, compare the exact processors within it.
In 2026, current AMD gaming builds commonly use Ryzen 7000-, 8000G-, or 9000-series desktop processors on AM5. AMD has also continued releasing selected AM4 processors, so a “new” retail listing is not necessarily a new platform.
Intel’s current desktop range uses Core Ultra desktop processors (Series 2) on LGA1851, including the original 200-series models and the 2026 Plus additions. Intel’s 12th-, 13th-, and 14th-generation Core processors remain available on LGA1700.
Do not compare model numbers across brands or generations as though they share one scale. A Ryzen 7 9850X3D, Ryzen 7 7700X3D, Core Ultra 7 270K Plus, and Core i7-14700K have different architectures, sockets, platform costs, and performance characteristics.
Common Intel Desktop Suffixes
- K: unlocked multiplier; CPU overclocking requires a compatible chipset and motherboard
- F: no enabled integrated graphics
- KF: unlocked multiplier and no enabled integrated graphics
- T: a power-optimized desktop model with different power and frequency targets
An Intel processor with an F suffix normally requires a discrete graphics card for monitor output. A model without F often includes integrated graphics, but always confirm on Intel’s specification page.
Common AMD Desktop Suffixes
- X: a higher-performance target within that product family; non-X processors still use automatic boost clocks
- X3D: additional 3D V-Cache, generally tuned for strong gaming performance
- G: traditionally identifies desktop processors with stronger integrated graphics, although AMD’s naming can vary by generation
- F: no enabled integrated graphics on that model
The absence of X does not mean that an AMD CPU lacks boost behavior. For example, non-X Ryzen processors still boost above their base clocks when power, temperature, and firmware conditions allow.
You should verify these details for the exact CPU:
- Socket
- Core and thread count
- Base and maximum boost frequencies
- Cache
- Default and maximum package-power behavior
- Integrated graphics
- Included cooler, if any
- Supported memory type
Retailers sometimes reuse titles or product pages across several SKUs. The CPU manufacturer’s specification page and the boxed product number are safer references than a shortened store title.
Performance Between CPU Generations
Newer processors generally improve performance, efficiency, features, or some combination of the three, but a new generation does not make every older CPU slower than every new CPU.
A lower-tier new processor can outperform a higher-tier old one in games that benefit from architectural improvements. The reverse can happen in heavily threaded work when the older chip has substantially more cores.
Cache also complicates the comparison. AMD’s X3D processors can perform exceptionally well in cache-sensitive games even when another CPU has higher clock speeds or more cores.
Use benchmarks from the applications and games you actually run. Compare:
- Average frame rate and 1% lows
- The same resolution and quality settings
- Whether the test is CPU-limited or GPU-limited
- Power consumption and cooling requirements
- The total cost of CPU, motherboard, memory, and cooler
The platform cost matters as much as the processor price. A discounted CPU is not a bargain if it requires an expensive motherboard and memory kit that erase the savings.
Overclocking
Overclocking is optional, and modern boost algorithms already extract much of the available everyday performance. Manual tuning can increase performance, reduce power through undervolting, or simply create instability if it is done poorly.
Intel Overclocking
For current Intel Core Ultra desktop processors, traditional CPU multiplier overclocking requires an unlocked K or KF processor and a Z890 motherboard. Intel’s 800-series chipset specifications list memory overclocking for B860 but no CPU multiplier overclocking; H810 lists neither CPU nor memory overclocking.
For 12th-, 13th-, and 14th-generation LGA1700 processors, an unlocked K/KF CPU and a compatible Z-series board are the conventional combination for CPU overclocking.
AMD Overclocking
On AM5, X870E, X870, X670E, X670, B850, B650E, and B650 support processor and memory overclocking controls. B840 and A620 support memory overclocking but not CPU multiplier overclocking. The exact controls available can still vary by CPU and BIOS.
X3D processors require special care. AMD has expanded tuning options on newer models, but voltage, temperature, and frequency limits are model-specific. Follow the exact CPU documentation rather than applying a guide written for a non-X3D processor.
Regardless of platform, an overclock needs:
- A motherboard with suitable power delivery
- A cooler that can handle the added heat
- A power supply with appropriate capacity and quality
- Stability testing under realistic workloads
Overclocking may reduce stability, component life, or warranty coverage. It should not be treated as a compatibility requirement for a gaming PC.
A Quick Rundown of TDP
TDP is a thermal-design reference, but it is not a universal measurement of maximum power draw or heat output.
AMD and Intel define their processor power specifications differently. Intel commonly publishes Processor Base Power and Maximum Turbo Power for current desktop processors. AMD publishes a default TDP and uses additional power-tracking limits that can allow socket power above that number.
This matters because a cooler advertised for a particular “TDP” is not guaranteed to handle every CPU carrying the same nominal value. Cooler manufacturers also use different test methods, and some—such as Noctua—avoid a simple TDP rating entirely.
Use TDP as one clue, then check:
- The CPU’s maximum or turbo power specification
- The motherboard’s default power behavior
- The cooler manufacturer’s CPU compatibility guidance
- Independent cooler tests at comparable heat loads and noise levels
- Your case airflow and room temperature
A motherboard can also change how long a processor holds high boost power. Two systems with the same CPU and cooler can therefore produce different temperatures and noise levels.
We cover this again in the CPU/cooler compatibility section.
Intel vs. AMD
Both AMD and Intel make capable gaming processors. Neither brand is always the best choice at every budget.
The older rule that Intel is for gaming and AMD is for heavily threaded productivity work is no longer useful. Performance leadership changes by model, workload, game, power setting, memory configuration, and price.
AMD’s X3D processors often perform extremely well in cache-sensitive games. Intel’s Core Ultra and older Core processors can be strong choices when their gaming, creation, platform features, or sale pricing fit the build. Some applications also have brand- or architecture-specific behavior.
Compare Complete Platforms
Do not compare only two CPU prices. Include:
- Motherboard price and features
- DDR4 or DDR5 memory cost
- Required cooler
- Power consumption
- Available CPU upgrade path
- Integrated graphics and media features
- The ports and expansion you need
AMD has committed to supporting AM5 through 2029, which can make an AM5 board attractive to someone who expects a later in-socket upgrade. That commitment does not guarantee that every current board will support every future CPU; the board vendor must still release an appropriate BIOS.
Intel Core Ultra desktop Series 2 processors use LGA1851 and Intel 800-series chipsets. They are not electrically compatible with LGA1700, even though Intel notes that LGA1700 and LGA1851 are mechanically similar for many heatsinks.
Use Relevant Benchmarks
A CPU chart measured at 1080p with a flagship GPU is designed to expose CPU differences. At 4K with a mid-range GPU, those differences may shrink because the graphics card becomes the limit.
Look for recent tests that include the games you play, especially if they are simulation-heavy, strategy-focused, competitive, or known to benefit from additional cache. For mixed-use systems, also compare the creation or productivity applications you use.
Our best gaming CPU guide covers current options at several price points. Independent outlets with repeatable methods can help you confirm the choice.
Choose the Best Combination for Your Budget
Suppose one CPU costs $20 less than its competitor, but a suitable motherboard and cooler add $100 more. The cheaper CPU is not the cheaper platform.
The opposite can also happen: a more expensive CPU may include a usable cooler or work with a less expensive board, lowering total cost.
Keep an open mind until you price the full CPU, motherboard, memory, and cooler combination. For gaming, spend enough to avoid a meaningful CPU limitation, then direct the remaining budget toward the GPU and display experience you actually want.
We’ve taken quite a large detour and covered how to differentiate between processor tiers and model families. You should now be able to look at a current model—such as a Ryzen 5 9600X, Ryzen 7 9850X3D, Core Ultra 7 270K Plus, or an older Core i7-14700K—and identify its broad position without assuming that the name alone proves its performance or compatibility.
If so, we can finally get back to discussing CPU-motherboard compatibility.
CPU Socket Compatibility

The CPU socket is a hard compatibility requirement. You cannot install an AM5 processor in an LGA1851 motherboard, an LGA1700 CPU in an LGA1851 board, or an AM4 CPU in an AM5 board.
Here are the mainstream desktop platforms most relevant in 2026:
- AMD AM5: Ryzen 7000, Ryzen 8000G, Ryzen 9000, and selected newer AM5 desktop processors; DDR5 only
- AMD AM4: Ryzen 1000 through Ryzen 5000 families, subject to chipset and BIOS support; DDR4
- Intel LGA1851: Core Ultra desktop processors (Series 2), including 2026 Plus models; Intel 800-series chipsets and DDR5
- Intel LGA1700: 12th-, 13th-, and 14th-generation Core desktop processors; Intel 600- and 700-series chipsets; DDR4 or DDR5 depending on the board
A matching socket is necessary, but it is not enough. A motherboard can physically accept a processor yet require a newer BIOS before it can boot.
How to Verify CPU Support
Use the exact motherboard manufacturer’s support page:
- Confirm the motherboard model and hardware revision.
- Open the CPU-support list.
- Find the exact CPU model.
- Note the minimum BIOS version listed for it.
- Confirm the board ships with that BIOS or has a CPU-less update feature.
Features such as BIOS Flashback, Flash BIOS Button, or Q-Flash Plus can update supported boards using a USB drive and PSU power without a working CPU. Names and procedures vary, so read the manual. Our guide on how to update a BIOS/UEFI safely explains the process and precautions.
A Simple Compatibility Example
Consider these two parts:
AMD Ryzen 7 5700G
ASUS TUF Gaming Z790-Plus
They are not compatible. The Ryzen 7 5700G uses AMD’s AM4 socket, while Z790 is an Intel LGA1700 chipset.
AMD’s product page identifies the 5700G as an AM4 processor. You would then need to choose an AM4 motherboard and check that board’s CPU-support list and BIOS requirement.

The same process works for a current Ryzen 9000 or Core Ultra desktop processor. Do not rely on a retailer filter alone, and do not assume that every board on a matching socket supports every CPU ever released for it.
CPU Generations
AMD and Intel release new processor generations or refreshes regularly. A new generation sometimes introduces a new socket, but several generations can also share one socket.
AM4 is the extreme example. It has supported many Ryzen generations over a long period, but support still varies by chipset, board model, BIOS capacity, and firmware version. Some early AM4 boards support later processors only after an update, and updating can occasionally remove support for much older CPUs.

AMD has extended its public AM5 support commitment through 2029. That gives the platform a long runway, but “socket support” does not mean that every AM5 board automatically supports every CPU without a BIOS update.
Intel used LGA1700 for its 12th-, 13th-, and 14th-generation desktop Core processors. Core Ultra desktop Series 2 moved to LGA1851 and Intel 800-series chipsets.

Processor generation matters for more than socket compatibility. It can affect:
- Required BIOS version
- Supported memory type and official data rates
- PCIe generation and lane allocation
- Integrated graphics and media features
- Power and cooling requirements
- Operating-system scheduling or driver behavior
When upgrading an existing system, identify the board and BIOS first. When building new, choose the CPU and platform together so you can price the complete combination.
Motherboard Chipsets
A motherboard chipset helps determine platform I/O and expansion, but it does not determine the quality of the whole motherboard.
Chipsets can influence:
- Which CPU families the platform can support
- CPU and memory overclocking options
- The number and generation of chipset-provided PCIe lanes
- USB and SATA connectivity
- How many high-speed devices can operate at once
The CPU also supplies its own PCIe and memory connections, so you need the motherboard block diagram and manual to understand the final layout.
A Chipset Is Not a Quality Rating
It is tempting to assume that every X- or Z-series board has stronger power delivery than every B-series board. That is not true.
A well-designed B850 or B860 motherboard can have a stronger VRM, better cooling, and a more useful I/O layout than a cheaply built board with a nominally higher-end chipset. Conversely, an entry-level board may be completely appropriate for an efficient mid-range CPU.
Compare the exact motherboard’s:
- VRM design and heatsinks
- CPU-support list
- Memory QVL
- M.2 and PCIe lane-sharing rules
- Rear USB, networking, and audio
- Internal fan, pump, RGB, and USB headers
- BIOS update and recovery features

Current Intel Desktop Chipsets
Intel Core Ultra Desktop Series 2 (LGA1851)
- Z890: enthusiast chipset; supports CPU, BCLK, and memory overclocking with an appropriate processor and motherboard
- B860: mainstream chipset; supports memory overclocking but not CPU multiplier overclocking
- H810: entry-level chipset; does not support CPU or memory overclocking
Core Ultra desktop Series 2 uses DDR5. Intel’s 2026 Core Ultra Plus desktop additions remain on LGA1851 and the Intel 800-series platform, but the exact board may require newer firmware.
Intel 12th-, 13th-, and 14th-Generation Core (LGA1700)
- 700-series: Z790, H770, and B760
- 600-series: Z690, H670, B660, and H610
A 600-series board may need a BIOS update for a later LGA1700 processor. LGA1700 motherboards usually provide either DDR4 or DDR5 slots. A few specialized combo boards provide both types, but the two DDR generations cannot be mixed, and the board’s specific slot restrictions apply.
Current AMD Desktop Chipsets
AMD AM5 800-Series
- X870E: maximum expansion within the mainstream AM5 family, with required USB4 and extensive PCIe connectivity
- X870: enthusiast features and required USB4, with a different lane configuration than X870E
- B850: mainstream performance and a common value target for gaming builds
- B840: entry-level AM5; memory overclocking is supported, but CPU multiplier overclocking is not
AMD AM5 600-Series
- X670E and X670: enthusiast-oriented chipsets with broad I/O
- B650E and B650: mainstream chipsets that often provide the best feature-to-price balance
- A620: entry-level; memory overclocking is supported, but CPU multiplier overclocking is not
The “E” variants guarantee particular PCIe 5.0 capabilities that are optional on their non-E counterparts. Still, inspect the exact slot and M.2 specifications; the chipset name alone does not tell you how a board divides every lane.
AMD AM4 Value Platforms
- X570: enthusiast AM4
- B550: mainstream AM4 and often the most practical match for Ryzen 5000
- A520: entry-level AM4
Older X470, B450, X370, B350, and A320 boards may support selected later AM4 CPUs with the correct BIOS. Never assume; use the exact board’s CPU-support list.
How to Narrow Down the Motherboard List
Start with hard requirements:
- Correct socket and exact CPU support
- Correct DDR generation
- Correct form factor for the case
- Enough M.2, PCIe, SATA, and USB connectivity
- Required Wi-Fi, Ethernet, audio, and front-panel headers
Then consider practical requirements:
- Is the VRM suitable for sustained CPU power?
- Does the board have enough fan and pump headers?
- Will installing multiple SSDs reduce GPU lanes or disable SATA ports?
- Can the board update its BIOS without a supported CPU?
- Does the memory QVL include the kit and configuration you plan to use?

Example #1: A Current AM5 Gaming Build
Suppose you choose an AMD Ryzen 7 9850X3D for a high-end gaming system.
You know it uses AM5 and DDR5. An X870E board is compatible, but that does not make it mandatory. If you need several high-speed expansion devices, extensive rear I/O, or required USB4, an X870E or X870 model may be worth the cost.
If you need one GPU, two or three M.2 drives, Wi-Fi, and normal gaming connectivity, a well-reviewed B850 or B650 board may be the better value. With an older B650 board, confirm that the exact CPU appears on its support list and that the board will have the required BIOS.
Because X3D processors are sensitive to firmware and memory configuration, check for current BIOS guidance, use a validated memory kit, and avoid assuming that the most aggressive EXPO profile is guaranteed.
The correct answer is the least expensive board that provides suitable power delivery, confirmed CPU support, and all the features you need—not automatically the most expensive AM5 chipset.
Example #2: A Current Intel Core Ultra Build
Now suppose you choose an Intel Core Ultra 7 270K Plus.
Intel lists this processor on LGA1851 with an Intel 800-series chipset. If you plan to use CPU multiplier overclocking, you need a Z890 board and suitable cooling. If you do not plan to overclock the CPU, a good B860 board can still support memory overclocking and may provide all the connectivity a gaming system needs.
H810 can work for a simpler build, but it offers fewer high-speed I/O resources and no memory overclocking. That does not make every H810 board bad; it means you must decide whether its limitations fit the build.
The processor’s power behavior also matters. A high-power Core Ultra configuration needs an appropriate VRM and cooler even when the socket and chipset are correct.
Example #3: A Budget AM4 Build
The Ryzen 5 5600 remains a useful budget example. It uses AM4 and DDR4 and has a modest default TDP.
An X570 board is compatible, but its extra cost and connectivity may not help a budget gaming build. B550 usually provides a better balance, including PCIe 4.0 support from the CPU for the primary GPU and NVMe drive on typical boards. A520 can cost less, but it provides fewer features and does not support CPU overclocking.
Do not use a fixed 2023 motherboard price to make the decision. Compare live prices. As older chipsets leave the market, a once-premium board can become cheaper than a scarce “budget” model.
A B550 motherboard is only a good choice when the exact board has the features and BIOS support you need. Check the CPU-support list, memory QVL, M.2 layout, fan headers, and rear I/O just as you would on a new AM5 board.
This example shows why the total platform budget matters. Money saved on unnecessary motherboard features can go toward a faster GPU, larger SSD, better monitor, or higher-quality power supply.
PCIe Lanes, M.2 Slots, and Shared Bandwidth
The chipset name and number of physical slots do not tell you how all of those slots operate at the same time. A motherboard may advertise several M.2 sockets and multiple full-length PCIe slots while sharing a limited set of CPU and chipset lanes between them.
Start with the motherboard’s specification table, but also read its expansion-slot notes and block diagram. Look for conditions such as:
- the primary graphics slot changing from x16 to x8 when a second CPU-connected slot or particular M.2 socket is populated;
- a full-length physical slot operating electrically at x4, x2, or x1;
- an M.2 socket disabling one or more SATA ports;
- two expansion slots being mutually exclusive;
- a socket supporting a different PCIe generation or lane count with certain CPUs; or
- USB4, Thunderbolt, high-speed networking, and storage controllers sharing chipset bandwidth.
PCIe is generally backward-compatible across generations. A PCIe 5.0 graphics card can normally operate in a PCIe 4.0 slot, for example, but it runs at the negotiated generation and lane width. Physical fit also matters: an open-ended x4 slot can accept some longer cards, while a closed short slot cannot, and a thick GPU may cover the slot you intended to use.
Do not panic when a modern graphics slot operates at x8 if the platform is designed that way; PCIe generation and workload determine the actual performance impact. The problem is not the number alone—it is discovering after purchase that installing an SSD changes the configuration you expected. Consult exact-card benchmarks when a lane reduction concerns you.
Rear I/O, Internal Headers, and Add-In Cards
Make a connection inventory before selecting the board:
- number and speed of rear USB-A and USB-C ports;
- front USB-C and USB-A headers required by the case;
- Ethernet speed and Wi-Fi/Bluetooth support;
- audio outputs, optical audio, microphone input, and any special DAC needs;
- fan, pump, temperature-sensor, RGB, and addressable-RGB headers;
- internal USB 2.0 headers for AIOs and controllers; and
- PCIe slots for a capture card, sound card, network adapter, or other expansion.
A board with built-in Wi-Fi should include antenna connections and usually an antenna in the box. Without the antenna, Wi-Fi and Bluetooth range can be poor. A motherboard without Wi-Fi can use a PCIe or USB adapter, but reserve the physical slot/port and confirm that the graphics card will not block it.
For front USB-C, match more than the connector shape. The case may advertise a particular USB speed while the motherboard’s internal Type-E header supports a slower mode. The port can still function, but only at the weakest supported link. Power-delivery and fast-charging features also depend on the board and case design.
Board Revision and Exact Model Name
Motherboard families often include Wi-Fi and non-Wi-Fi editions, DDR4 and DDR5 editions, and revisions with different controllers. Names such as “Plus,” “AX,” “M,” “E,” “V2,” and “Rev. 1.1” are not decorative. They can change form factor, memory type, networking, BIOS file, and CPU support.
Download files only from the support page for the exact model and hardware revision printed on the board or box. Flashing a BIOS intended for a similarly named model can fail or damage firmware. When a retailer combines variants on one page, confirm the manufacturer’s part number before ordering.
Bottom Line on CPU/Motherboard Compatibility
Use this order:
- Choose the CPU based on measured performance and total platform cost.
- Match the socket and DDR generation.
- Confirm the exact CPU and minimum BIOS on the motherboard support page.
- Choose a chipset tier that provides the features you need.
- Evaluate the exact board’s VRM, slots, lane sharing, I/O, headers, and memory support.
If all five checks pass, you have a compatible and appropriate CPU/motherboard combination—not merely two parts that happen to share a socket.
2. RAM Compatibility

Memory compatibility deserves its own section because a kit can fit the slots and still fail to reach its advertised speed—or, in a few cases, fail to boot with a particular capacity or module configuration.
When choosing RAM for a 2026 gaming PC, verify all six of the following:
- Form factor
- DDR generation
- Capacity and number of modules
- Supported speed and memory profile
- The motherboard’s memory support list and BIOS notes
- Physical clearance under the CPU cooler
The first two are hard compatibility requirements. The others affect whether the system will boot reliably, run at the speed you paid for, leave room for future upgrades, and physically fit together.
RAM Form Factor
The two memory form factors most buyers encounter are:
- UDIMM/DIMM: full-size desktop memory
- SO-DIMM: shorter memory used primarily in laptops and some mini PCs
For a normal socketed desktop motherboard, you almost always want unbuffered desktop DIMMs. Server-oriented registered DIMMs and laptop SO-DIMMs are not interchangeable with ordinary desktop memory.

Search results can mix desktop and laptop kits, so do not rely on capacity and DDR generation alone. Check for UDIMM, DIMM, or desktop memory in the listing and verify the exact part number on the manufacturer’s page.
You may also encounter DDR5 CUDIMMs. These modules include a clock driver and are intended for platforms that explicitly support them. Do not assume a CUDIMM will behave like a standard DDR5 UDIMM merely because the notch appears correct; consult the motherboard manual, memory support list, and CPU platform documentation before buying one.
RAM DDR Generation
DDR generation is a hard compatibility requirement. DDR4 and DDR5 have different electrical designs and key positions. A DDR5 module cannot be installed in a DDR4 slot, and DDR4 cannot be installed in a DDR5 slot.
For the mainstream desktop platforms discussed in this guide:
- AMD AM5: DDR5 only
- Intel LGA 1851/Core Ultra desktop: DDR5 only
- Intel LGA 1700: the platform supports DDR4 or DDR5, but nearly every motherboard is built for only one of them
- AMD AM4: DDR4 only
With an LGA 1700 build, the motherboard model—not just the CPU—determines which memory you need. Manufacturers produced separate DDR4 and DDR5 versions of some boards, and the two versions can have nearly identical names.


Rare LGA 1700 combo boards do include both DDR4 and DDR5 slots. They are exceptions, and they still do not allow both memory generations to be used at the same time. Follow the board manual’s installation restrictions exactly.
How to Confirm the DDR Generation
Do not use a retailer’s category filter as your final check. Open the exact motherboard product page and confirm the memory type in its specifications. Then compare that specification with the exact part number of the RAM kit.
The safe order is:
- Choose the CPU platform.
- Choose the exact motherboard.
- Read the motherboard’s memory specifications and manual.
- Choose a kit of the required DDR generation.
Capacity and Number of DIMMs
For a new gaming build in 2026, 32GB as a matched 2x16GB kit is the sensible default. A carefully budgeted esports or entry-level machine can still run many games with 16GB, but background applications and newer titles make 32GB the more comfortable target. Consider 64GB or more when the PC will also handle heavy mod packs, large creative projects, virtual machines, or other memory-intensive work.
For a deeper capacity discussion, see our guide on how much RAM you need for gaming.
Motherboards normally have two or four memory slots. Standard ATX boards usually provide four; Mini-ITX boards provide two; Micro-ATX can provide either. Count the slots and check the board’s maximum capacity before buying a four-module kit.


Even on a four-slot board, two modules are usually easier for the CPU’s memory controller to run at a high data rate than four. If you know you need 64GB, a validated 2x32GB kit is generally a better starting point than combining two separate 2x16GB kits.
Buy a single matched kit at the capacity you need. Two kits with the same marketing name may contain different memory chips or revisions, and neither the memory vendor nor motherboard vendor necessarily validates mixed kits. Combining kits can force you to reduce speed, loosen timings, or troubleshoot instability.


When installing two modules in a four-slot board, use the slots specified in the manual—commonly A2 and B2, which are the second and fourth slots away from the CPU. Using the wrong pair can prevent the memory profile from training correctly or can leave the system in a less desirable channel configuration. See our explanation of memory channels for more detail.
RAM Speed, Timings, and Profiles
DDR memory’s advertised transfer rate should properly be expressed in megatransfers per second (MT/s), even though retailers and manufacturers frequently label it MHz. A kit advertised as DDR5-6000 performs 6,000 million transfers per second; its underlying clock is lower because DDR transfers data twice per clock cycle.
Speed is only part of memory performance. Timings—often written as a sequence such as CL30-36-36—describe delays for particular operations. A lower CAS-latency number is not automatically faster when comparing kits at different transfer rates, so compare the complete speed and timing combination.
Most performance kits boot at a conservative JEDEC speed. Their advertised setting is stored in an overclocking profile, commonly Intel XMP or AMD EXPO. You normally enable that profile in the BIOS after confirming the machine is stable at default settings. Because XMP and EXPO settings exceed the platform’s baseline specification, the advertised profile is not an unconditional guarantee for every CPU, motherboard, BIOS, capacity, and module count.
The maximum stable memory setting depends on:
- the CPU’s integrated memory controller;
- the motherboard’s layout and BIOS;
- the number and capacity of the modules;
- whether the modules are single-rank or dual-rank;
- the memory chips and profile programmed into the exact kit; and
- any manual overclocking or voltage changes.
A motherboard page may advertise an extremely high maximum speed achieved with a particular one-DIMM-per-channel configuration. That headline number does not mean four high-capacity modules will run at the same setting.
Use the Memory Support List as Evidence, Not a Promise
Motherboard manufacturers publish a qualified-vendor list (QVL) or memory support list. Search it using the RAM kit’s complete part number, then confirm the tested capacity, number of modules, and speed. A listing is useful evidence that the combination was tested; it is not a promise that every CPU sample will hold the same overclock. Conversely, a kit missing from the list is not automatically incompatible—the manufacturer cannot test every kit on the market.
Also read the motherboard’s BIOS notes. Memory compatibility and training behavior often improve over time. If a board needs a newer BIOS for the CPU or memory configuration, plan how you will update it before assembly. Our BIOS update guide explains the process.
Memory-performance differences are platform- and workload-dependent. Avoid broad rules such as “AMD always benefits from faster RAM” or “Intel does not.” Use recent benchmarks for the exact CPU generation, game, resolution, capacity, and memory settings you are considering. Paying a large premium for a fragile top-end memory overclock rarely makes sense for a gaming build when that money could improve the GPU or CPU.
For more background on specifications and kit types, see our guide on how to choose RAM. You still need to perform the checks above for your exact motherboard and processor.
Worked RAM Compatibility Example
Suppose you are building with an AM5 processor, a four-slot B850 motherboard, and a large dual-tower air cooler. You want 32GB of memory and have found a DDR5-6000 2x16GB EXPO kit.
Start with the hard checks. AM5 requires DDR5, the kit contains desktop UDIMMs, and two modules fit the motherboard’s four slots. Then search the board’s memory-support page for the kit’s complete part number—not just the brand and “DDR5-6000.” If it appears, confirm that the tested entry is the same 2x16GB capacity and that the support table applies to your processor family.
Next, read the motherboard manual for the preferred two-module slots. They will commonly be A2 and B2, but the manual is authoritative. Check the CPU support page for the required BIOS at the same time; a new processor on an older production board may need a firmware update before the memory can train correctly.
Now check performance expectations. DDR5-6000 EXPO is an overclocked profile, not the guaranteed boot default. Plan to assemble and test at JEDEC defaults first, update the BIOS if necessary, enable EXPO, and run a proper memory-stability test. If the profile is unstable, a small reduction in data rate may be preferable to aggressive voltage changes.
Finally, check physical fit. If the RAM is 44mm tall and the cooler provides only 32mm under its front fan, the fan must be raised about 12mm. Add that 12mm to the cooler’s normal installed height and compare the result with the case limit. A kit can therefore pass the motherboard QVL and still be the wrong physical choice for the complete build.
This same sequence works for other platforms: hard type and slot checks first, validated configuration and BIOS second, speed expectation third, and physical clearance last.
RAM Clearance
Tall heat spreaders and RGB light bars can interfere with large air coolers. Check the RAM’s height, the cooler’s stated clearance, and whether a front fan can be raised without exceeding the case’s CPU-cooler height limit. We walk through that three-way check in the RAM clearance section below.
RAM compatibility checklist:
- Desktop UDIMM, not SO-DIMM or registered server memory.
- The DDR generation required by the exact motherboard.
- A matched kit whose module count fits the board.
- A sensible capacity and speed for the platform.
- The complete kit number checked against the current support list.
- The correct slots, current BIOS, and enough cooler clearance.
3. CPU/Cooler Compatibility

A processor that reaches its temperature or power limits may reduce clock speed to protect itself. The goal is not to chase the lowest possible temperature; it is to choose a cooler that can handle the processor’s real heat output at an acceptable noise level and that fits the socket, motherboard, memory, and case.
Some retail processors include a cooler, while many performance-oriented models do not. Box contents can vary by CPU model and region, and tray/OEM processors normally do not include a retail cooler. Check the exact product page instead of assuming that every “boxed” CPU includes one.

An aftermarket cooler must pass three separate checks:
- Mounting compatibility: it includes the correct hardware for the socket and motherboard.
- Cooling performance: it can handle the CPU’s sustained and burst power behavior at the noise level you will tolerate.
- Physical clearance: it fits the case, RAM, graphics card, motherboard heatsinks, and radiator mounting location.
Socket and Mounting Compatibility
The current and still-relevant desktop sockets you are most likely to encounter are AMD AM5 and AM4 and Intel LGA 1851 and LGA 1700. A cooler listing that says “Intel compatible” or “AMD compatible” is not specific enough. Look for the exact socket.

LGA 1851 and LGA 1700 use the same nominal cooler-hole spacing, so many LGA 1700 coolers can be used on LGA 1851. That does not make the processors or motherboards cross-compatible, and it does not eliminate the need to check the cooler manufacturer’s LGA 1851 support statement. Contact-frame shape, cold-plate coverage, included hardware, and installation instructions still matter.
Many AM4 coolers also support AM5, but not every mounting method carries over. AM5 uses a fixed socket backplate; a cooler that requires replacing the AM4 backplate may need different hardware. Confirm AM5 compatibility on the cooler’s current support page.
Do not assume that an older unit in a retailer’s warehouse contains the newest bracket just because the manufacturer later added support. Check the package revision or ask the seller. Some manufacturers provide upgrade kits separately.
Check the Whole Mounting Area
Socket support alone does not guarantee that a large cooler will clear the motherboard. Examine the board and cooler compatibility pages for interference with:
- tall VRM heatsinks and decorative covers;
- the first PCIe slot on compact boards;
- rear-side components and backplates;
- RAM modules under an offset or overhanging tower; and
- M.2 heatsinks close to the socket.
Detailed cooler manufacturers sometimes publish motherboard-specific compatibility databases. Use those when available.
Choosing Enough Cooling Performance
You should not choose a cooler by socket alone. A low-profile cooler intended for a compact 65-watt build and a large dual-tower cooler may support the same socket but have very different thermal and acoustic limits.

TDP can help categorize a processor, but it is not a universal cooler-sizing number. AMD and Intel define processor power specifications differently, motherboard defaults can change power limits, and cooler makers do not all calculate a “TDP rating” the same way. A cooler advertised for 250 watts is not automatically equivalent to another company’s 250-watt cooler.
Instead, use this process:
- Read the CPU’s official thermal and power specifications, including maximum turbo/socket power where the manufacturer provides it.
- Decide whether you will use official defaults, an unlocked motherboard profile, manual overclocking, or a power-limited/efficiency mode.
- Check the cooler manufacturer’s compatibility rating for the exact CPU.
- Compare independent cooler testing conducted at controlled room temperature and, ideally, at normalized noise levels.
- Allow for the case’s airflow, local ambient temperature, dust buildup, and your preferred fan noise.

For cooler reviews, prioritize tests that disclose the CPU settings, heat load, ambient temperature, fan speed, and noise methodology. A temperature chart without those details can be misleading. Gamers Nexus, Hardware Canucks, Tom’s Hardware, and TechPowerUp are useful places to look, but make sure the test data covers the cooler revision and CPU class you are considering.
Temperature Behavior Is Not the Same on Every CPU
Modern processors actively use available thermal and electrical headroom to boost. A high-end CPU can therefore run near its intended temperature target with more than one cooler while delivering different clock speeds, package power, or noise. Compare performance and acoustics, not temperature in isolation.
Some X3D processors have lower power limits than adjacent non-X3D flagships but can still be challenging to cool because heat must move through stacked silicon and the heat spreader. Conversely, a processor with a high published maximum power can be made far easier to cool by using its official baseline limits or an efficiency mode. The exact CPU and settings matter more than the product tier printed on the box.
Air Cooler or AIO?
Both can be correct choices:
- Air coolers are mechanically simple, usually require only fan maintenance, and can offer excellent value. Large models can block RAM or be too tall for the case.
- All-in-one liquid coolers move the heatsink to a radiator and can provide strong sustained cooling. They add a pump, more cabling, and strict radiator-clearance requirements.
An AIO is not inherently quieter. Pump noise, fan quality, radiator thickness, placement, and control curves all affect the result. Likewise, a larger radiator name does not tell the whole story: a thick 360mm radiator can require more room than a slim 420mm unit in one dimension and less in another.
For more background on cooler types and specifications, see our guide on how to choose a CPU cooler. Use the exact-model checks in this guide before buying.
Headers, Control, and Installation Details
For an air cooler, confirm the motherboard has an accessible CPU_FAN header and that any second fan can share a suitable splitter or header within its current limit.
For an AIO, read both manuals before assembly. Depending on the model, the pump may connect to AIO_PUMP, CPU_FAN, SATA power, USB 2.0, or a proprietary controller. The radiator fans may connect to CPU_FAN, a hub, or the pump assembly. Connect and configure the system exactly as the cooler maker instructs so the BIOS can monitor the appropriate signal.
Use the thermal interface material and mounting procedure specified for the cooler. Remove the cold-plate protection film, tighten the mounting screws evenly in the stated order, and do not combine random standoffs or backplates from another revision.
Cooler Clearance
For a tower air cooler, check:
- the cooler’s installed height versus the case’s maximum CPU-cooler height;
- RAM height and whether the front fan must be raised;
- clearance around motherboard heatsinks and the graphics card; and
- whether raising a fan increases total height beyond the side panel.
For an AIO, check:
- the exact supported radiator position and size;
- radiator thickness plus fan thickness, not just “240mm” or “360mm”;
- clearance to RAM, motherboard heatsinks, GPU length, drive cages, and PSU shrouds;
- tube reach and a sensible pump/radiator orientation; and
- whether installing one radiator or fan removes another mount.
We work through real clearance examples in Air Cooler Clearance, RAM Clearance, and AIO Cooler Clearance below.
Worked CPU-Cooler Compatibility Example
Imagine that you have chosen a current high-performance processor, a B-series motherboard, and a 240mm AIO. A retailer’s compatibility tool marks every part green. That tells you very little about sustained temperature, noise, or actual radiator fit.
First, confirm the cooler package includes the exact socket bracket. If support was added after the cooler launched, verify that inventory from the chosen seller includes the new hardware. Then read the CPU’s official power specifications and the motherboard’s default behavior. Some boards enable aggressive vendor profiles that allow more sustained power than the processor’s baseline settings.
Next, find controlled reviews of the AIO. A test on a low-power CPU cannot establish that it will quietly handle a flagship. Prefer a review that includes a comparable heat load, noise-normalized results, pump behavior, and the exact cooler revision. Decide whether the result meets your own acoustic goal; “does not thermal-throttle” is a very low bar for an expensive cooler.
Now inspect the case manual. A front 240mm mount might accept the radiator but reduce GPU length by the radiator-and-fan stack. A top 240mm mount might clear the GPU yet collide with the motherboard’s VRM heatsink or tall RAM. Record the radiator’s outside length and total installed thickness rather than treating “240mm” as a complete measurement.
Finally, map the connections. Confirm the pump-power, tachometer, fan, USB, and RGB connections specified by the cooler manual. Count shared USB 2.0 headers if the case controller, AIO, lighting controller, and other devices all need one. At that point you have verified mounting, performance, physical fit, and control—not merely socket compatibility.
CPU-cooler compatibility checklist:
- The exact socket is on the cooler’s current support list.
- The required bracket is included in the box or obtained separately.
- The cooler is appropriate for the exact CPU, power settings, case airflow, and noise goal.
- The cooler, RAM, motherboard, GPU, and side panel physically clear one another.
- An AIO radiator and its fans fit together in the intended position.
- The motherboard has the headers or controller connections the cooler requires.
4. Case Compatibility

A case determines far more than the appearance of the finished PC. It sets the physical limits for the motherboard, PSU, graphics card, coolers, radiators, fans, drives, and cables, and its intake design strongly affects temperature and noise.
Check these categories:
- Motherboard dimensions and connector layout
- Power-supply form factor, length, and cable space
- Graphics-card length, height, thickness, and cable clearance
- Air-cooler installed height
- Radiator position, outside dimensions, and total thickness
- Storage mounts and layout conflicts
- Front-panel, fan, lighting, and controller headers
Important: Case specifications usually describe several possible configurations, not one configuration that supports every maximum simultaneously. A case may support its longest GPU only without a front radiator, or its maximum PSU length only after a drive cage is removed. Read the layout diagrams and footnotes.
Motherboard Form Factor and Dimensions
The common consumer motherboard form factors are Mini-ITX, Micro-ATX, ATX, and extended variants commonly labeled E-ATX. A larger case often accepts smaller boards because their mounting patterns are subsets of the ATX layout, but do not treat that as universal. Verify the exact form factors listed in the case manual and install standoffs only where the motherboard has mounting holes.

The familiar dimensions are approximately:
- Mini-ITX: 170 x 170mm
- Micro-ATX: up to 244 x 244mm
- ATX: 305 x 244mm
Consumer “E-ATX” labeling is less precise. Boards sold under that label vary in width, and a case’s E-ATX support may cover cable-routing holes or require moving a bracket. Compare the motherboard’s stated dimensions with the case’s maximum board dimensions and E-ATX notes.
“Mid-tower” and “full-tower” are descriptive marketing categories, not compatibility standards. A mid-tower can support a wide board that another full-tower does not. Use dimensions and the support table instead of the case-class name.
Standard ATX and Micro-ATX Example
The ASRock B650 Pro RS is a standard ATX motherboard. The original Lian Li LANCOOL 205M is a Micro-ATX case, so that pairing fails even though the case is large enough for many powerful components.


The solution is to choose a Micro-ATX motherboard with the required features or a case that explicitly supports ATX. Do not attempt to drill mounting holes or run a motherboard with missing required supports.
Rear-Connector Motherboards
Some current motherboards place the 24-pin power, fan, front-panel, and other connections on the rear. ASUS BTF, MSI Project Zero, and similar designs require a case with cutouts in the correct positions. Their nominal ATX or Micro-ATX size does not guarantee that a normal case supports the rear connectors.
Check the case’s explicit compatibility list for the exact rear-connector ecosystem and board size. Also verify space behind the motherboard tray for the connectors and cable bends.
Power-Supply Fit
Most mainstream cases use ATX PSUs, while compact enclosures may require SFX or SFX-L. Some compact cases support more than one type with different brackets or component restrictions.

Check the PSU’s length and the case’s limit with the drive cage, front radiator, and modular cables installed. A connector panel flush against a drive cage is not usable clearance. Allow room to insert and bend the cables without crushing them.
An SFX PSU can often be installed in an ATX position with a bracket, but the short cables included with an SFX unit may not reach in a large case. Conversely, using an ATX unit in a compact case can reduce GPU or radiator options even when it is officially supported.
Graphics-Card Fit
Check more than length. The exact card’s height, thickness, occupied slots, power-plug position, and anti-sag bracket all matter.
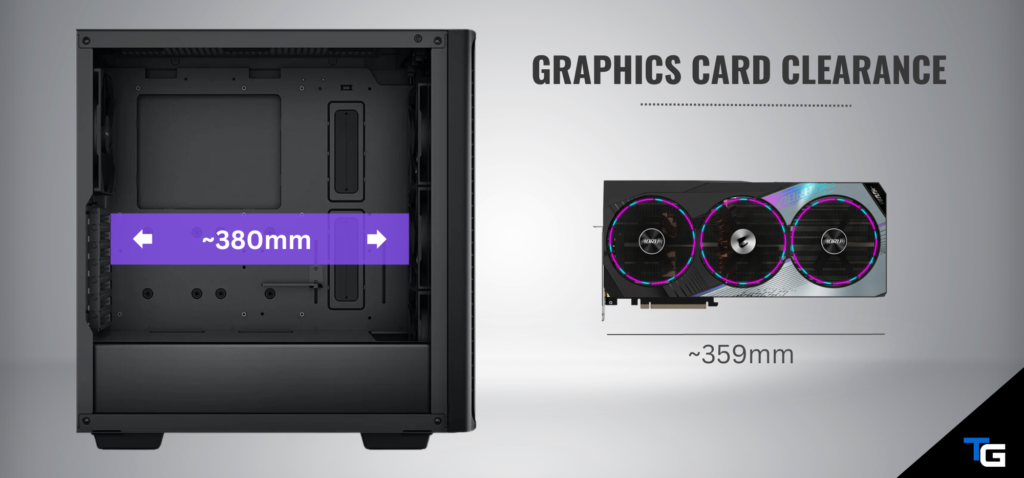
A front radiator reduces available card length in many layouts. A tall card also requires side-panel room for its power cable, especially when it uses 12V-2×6. See Graphics Card Clearance for a complete walkthrough.
Air-Cooler Fit
Compare the cooler’s final installed height with the case limit. If a front fan must be raised over tall RAM, add that amount to the cooler’s normal height.

Also check motherboard heatsinks, the first expansion slot, and rear exhaust-fan clearance. See Air CPU Cooler Clearance and RAM Height Clearance for worked examples.
Radiator and Fan Support
Case support for a nominal radiator length is only the first filter. Check the radiator’s complete length, width, thickness, fan thickness, tube/fitting position, and the case’s restrictions in that location.

A top radiator can interfere with RAM or VRM heatsinks. A front radiator can reduce GPU length or require removal of a drive cage. A side radiator can conflict with GPU width or a top radiator. See AIO/Radiator Clearance for detailed examples.
Fans, Airflow, and Controllers
Count the fans actually included, not those shown in promotional photos. Record the supported fan sizes and positions, then check whether a radiator occupies or removes any of those positions.
A mesh opening does not guarantee unrestricted airflow; filters, narrow side vents, and solid decorative panels can increase resistance. For a gaming build, a clear intake path to the GPU and an exhaust path for CPU/GPU heat are more important than a large number of poorly placed fans.
Match the motherboard’s headers and limits:
- four-pin PWM fans can be speed-controlled by PWM;
- three-pin DC fans require a header/controller that supports voltage control;
- a splitter does not increase a header’s safe current capacity;
- a powered hub may require SATA power and a PWM control lead; and
- 5-volt three-pin addressable RGB and 12-volt four-pin RGB are electrically different.
If the case includes a proprietary controller, check whether it requires an internal USB 2.0 header, a motherboard lighting header, or vendor software.
Storage Device Compatibility
Storage compatibility now divides into two separate questions: whether the motherboard can electrically support the drive and whether the case has a physical place to mount it.
M.2 NVMe and M.2 SATA Drives
An M.2 SSD mounts to the motherboard, so the case normally does not determine its compatibility. The important checks are on the motherboard and drive specifications:
- Protocol: an M.2 slot may support PCIe/NVMe, SATA, or both. The shared M.2 shape does not guarantee shared protocol support.
- Physical length: 2280 is common, but boards and drives can use other sizes such as 2230, 2242, 2260, or 22110. The first two digits are width in millimeters and the remaining digits are length.
- PCIe generation and lanes: a newer PCIe drive is usually backward-compatible, but it will run at the slot’s available link speed. Read the manual for any lane-sharing limits.
- CPU versus chipset connection: some M.2 slots work differently depending on which CPU is installed.
- Shared ports: populating a particular M.2 slot can disable a SATA port, reduce a PCIe slot’s lanes, or change the graphics slot’s link configuration on some motherboards.
- Heatsink clearance: use either the motherboard’s M.2 heatsink or the SSD’s supplied heatsink unless the instructions explicitly allow stacking them.
The motherboard block diagram and storage table in the manual are more reliable than a retailer’s claim that the board has “four M.2 slots.” Check what each slot does with your exact processor and other expansion cards installed.
2.5-Inch SATA SSDs and 3.5-Inch Hard Drives
SATA drives require a physical case mount, a SATA data port on the motherboard, and SATA power from the PSU. A 2.5-inch SSD often mounts behind the motherboard tray or on a removable bracket. A 3.5-inch hard drive normally requires a larger cage or sled.

Case specifications may list 2.5-inch and 3.5-inch mounts as “combined” positions. For example, a case advertised with two 3.5-inch and four 2.5-inch mounts may not hold all six drives simultaneously if two of the 2.5-inch positions are the same trays used by the hard drives. Check the manual’s drive-layout diagrams.
Also verify that a drive cage does not conflict with:
- a front radiator and its fans;
- a long power supply or stiff modular connectors;
- a thick graphics card or vertical GPU mount; or
- the cable-routing space needed for SATA power plugs.

Hard drives remain useful for inexpensive bulk storage, archives, and local backups. For the operating system and frequently played games, an NVMe SSD is usually the better choice. See our guide on what to look for in an SSD for more background.
Front-Panel and Case-Feature Compatibility
A case can physically fit a motherboard yet include features the board cannot connect. Before buying, compare the case cables with the motherboard’s internal headers:
- front USB-A ports may require USB 3.x and/or USB 2.0 headers;
- a front USB-C port usually requires the appropriate internal Type-E header at the speed the case advertises;
- front audio uses the HD_AUDIO header;
- included fan or RGB hubs may require SATA power, USB 2.0, PWM, 5-volt addressable-RGB, or a proprietary controller; and
- reverse-connector motherboards require a case specifically designed with the necessary rear cutouts.
Adapters can sometimes restore a missing feature, but it is better to choose a board with the headers you need. Never connect a 5-volt three-pin addressable-RGB device to a 12-volt four-pin RGB header.
5. Power Supply Compatibility

The power supply is a safety-critical component. It must provide enough sustained and transient power, fit the case, include the correct connectors, and be a well-reviewed implementation of the exact model you purchase.
Five checks matter:
- Capacity for the complete system
- Build quality and protections
- ATX, SFX, or SFX-L form factor and physical length
- CPU, GPU, motherboard, and accessory connectors
- Correct cable installation—especially 12V-2×6 on high-power graphics cards
Choose the Required Capacity
The PSU’s wattage is the maximum power the unit is designed to provide under its specified conditions; it does not continuously force that amount into the PC. A 1,000-watt PSU connected to a 400-watt workload draws only what the system needs, plus conversion losses.
The graphics card is normally the starting point because its manufacturer publishes a recommended system power for a reference configuration. Add the exact CPU and the rest of the build, then account for boost behavior, transient spikes, overclocking, pumps, drives, and future upgrades.
Do not apply one fixed rule—such as always adding 100 watts or always buying twice the estimated load—to every PC. Too little headroom can cause shutdowns or force a replacement after an upgrade; excessive capacity can waste money that would improve performance elsewhere.
Use this process:
- Read the official recommendation for the exact graphics-card model. A partner card with a higher power limit may differ from the reference card.
- Check the CPU’s maximum turbo/socket power behavior, not only its nominal TDP.
- Enter the complete build into a reputable calculator such as OuterVision, Newegg, or Seasonic.
- Compare the result with both the GPU recommendation and the PSU maker’s guidance.
- Add reasonable headroom for transient load, aging, noise, and upgrades, then select a quality unit in the next standard capacity.

High-end 2026 graphics cards make exact-model checking especially important. NVIDIA’s reference specifications for the GeForce RTX 5090, for example, list extremely high board power and system-power guidance, while partner cards can use different coolers, limits, connectors, and recommendations. Do not transfer the requirement from a review of one card to another card that happens to use the same GPU.
Capacity Also Affects Noise and Upgrade Room
A PSU is often most efficient and quiet below its maximum output, but the precise fan curve and efficiency profile depend on the model. A larger number on the label does not automatically mean a quieter unit. Read the load/noise measurements in a professional review.
If you expect a major GPU upgrade, buying some extra capacity now can be reasonable. If the build is unlikely to change, a properly sized high-quality unit is usually a better purchase than a much larger mediocre one.
Not All Power Supplies Are Equal
A high wattage label and an 80 PLUS badge do not prove that a PSU is well built. Efficiency certification primarily describes conversion efficiency under particular test conditions. It does not, by itself, certify voltage regulation, ripple, transient response, component quality, fan behavior, hold-up time, or the complete protection set.

Look for independent testing of the exact model and capacity. Products in one branded series can use different platforms at different wattages, and manufacturers sometimes revise a series without making the differences obvious in a retailer’s title.
A thorough review should cover, where possible:
- continuous output at realistic operating temperatures;
- voltage regulation and ripple suppression;
- transient response and ATX 3.x excursion behavior;
- over-current, over-power, over-voltage, under-voltage, short-circuit, and over-temperature protection;
- efficiency, standby behavior, fan noise, and component quality; and
- cable gauge, connector temperatures, and warranty support.
Hardware Busters, TechPowerUp, and Tom’s Hardware publish instrumented PSU testing. Our guide on how to choose a power supply provides more background, but confirm that any professional review covers the exact model name, wattage, and revision you intend to buy.
ATX 3.1 and PCIe 5.1
For a new high-power gaming build, a PSU built to the current ATX 3.x design guide with the appropriate native GPU cable is a strong default. The current specification includes requirements intended to handle rapid power excursions and supports the revised 12V-2×6 connector ecosystem. This does not make every ATX 3.1 unit high quality, and an excellent older PSU can still be suitable when it meets the card maker’s requirements and has the approved connections.
Treat the standard as one compatibility feature, then evaluate the actual PSU review and warranty.
Power-Supply Form Factor and Length
The three common consumer form factors are:
- ATX: the normal desktop size
- SFX-L: a small-form-factor body with extra length
- SFX: the smaller standard used in many compact cases
Case support is not determined by the form-factor name alone. ATX units vary in length, and a longer PSU can collide with a hard-drive cage, radiator, fan, or bundle of modular cables. Compact cases may support an ATX PSU only when a shorter GPU or different bracket position is used. Check the case manual’s PSU-length limit for the exact layout you plan to build.


An SFX-to-ATX adapter bracket allows many small PSUs to mount in an ATX case, but the shorter modular cables supplied with an SFX unit may not reach in a large tower.
Motherboard and CPU Power Connectors
A modern motherboard normally needs the 24-pin ATX cable plus one or more EPS12V CPU-power connections near the top edge. EPS CPU connectors and PCIe 6+2-pin GPU connectors can look similar, but they are wired differently. Never force one into the other.

Some motherboards have an 8-pin plus a second 4-pin or 8-pin CPU socket. Whether the supplemental connector is optional depends on the exact board, CPU, and intended power settings. Do not assume it can always be left empty. The motherboard manual identifies the primary connector and any conditions for the additional one.

Count PSU-side modular sockets only after reading the PSU manual. A socket labeled CPU/PCIe may accept either of the manufacturer’s approved cables, but the device ends are not interchangeable.
Graphics-Card Power Connectors
Current graphics cards commonly use one of two approaches:
- one or more conventional 6-pin or 8-pin (6+2) PCIe connectors; or
- a 16-pin 12V-2×6 connector, sometimes supplied through an approved adapter from multiple 8-pin PCIe cables.

Read the exact card’s product page and installation guide. Count the required connectors, then verify that the PSU includes the correct number and type of cables. A retailer photo may show another wattage or revision, so use the PSU manufacturer’s cable table and manual.
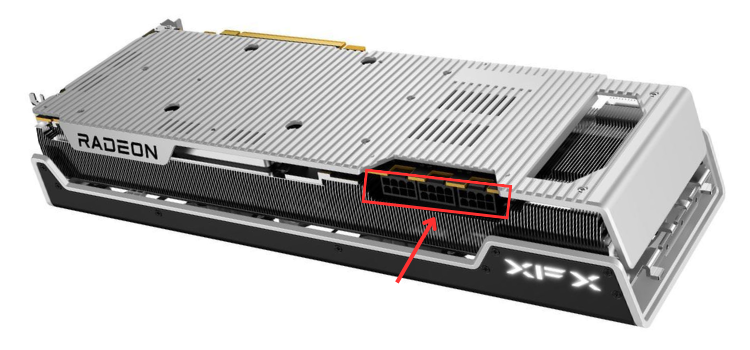
When a card uses multiple 8-pin sockets, separate PSU cables are the conservative choice when the graphics-card and PSU instructions recommend them. Some reputable PSUs are designed and approved to use a dual-connector cable within stated limits, so the manufacturer instructions take precedence over a blanket internet rule. Never use a SATA-to-PCIe or other unapproved power adapter for a high-load GPU.
12V-2×6 Installation
The 12V-2×6 connector must be fully inserted, latched, and routed without a tight bend at the plug. It is compact and can carry substantial power, so installation quality matters:
- Use the native PSU cable or the exact adapter supplied or approved for the graphics card and PSU.
- Insert the plug straight and fully until the latch is engaged. Inspect all sides for a visible gap.
- Do not pull the cable sideways while seating it.
- Leave the connector body and the cable immediately behind it straight for at least the distance required by the cable manufacturer before beginning a gradual bend.
- Make sure the side panel does not press against the plug or force a sharp bend.
- After cable management and before closing the case, inspect the connection again.
Different cable makers publish different bend-clearance instructions; follow the instructions supplied with your exact cable. The case must have enough width for the connector and safe bend radius in addition to enough room for the card itself.
A “12VHPWR” cable and a newer 12V-2×6 connection are often grouped together in store listings, but revisions and allowed power ratings vary. Verify compatibility and maximum rating with both the PSU and GPU manufacturer. Do not assume that a 16-pin plug from an unrelated modular PSU is safe.
Never Mix Modular PSU Cables
The component-end connectors are standardized, but the pinout at a modular PSU is not universal. Cables from two units can physically fit while sending voltage to the wrong pins, destroying drives, the graphics card, or other components.
Use only the cables supplied with the exact PSU or cables that its manufacturer explicitly lists as compatible with that exact model. This rule applies even when the other cable came from the same brand. If you replace a modular power supply, remove and replace its modular cables too.
Do not use an extension cable as a substitute for a missing modular cable. An extension attaches to the device end of a correct PSU cable; it does not plug directly into the PSU. If you use extensions, choose a reputable set of the correct gauge, inspect every pin, and include the extra connector length in your cable-management and resistance considerations.
Two PSU Compatibility Walkthroughs
The following examples show why wattage and connector count must be evaluated together.
Example 1: High-Power GPU With 12V-2×6
Start with the exact graphics-card support page. Record its recommended system power, connector type, and any statement about a native cable or supplied adapter. Then build the full system in a PSU calculator using the exact CPU and intended power settings.
Suppose the result and card maker point you toward the same general PSU capacity. You still have four checks left:
- Find an instrumented review of the exact PSU model and wattage.
- Confirm that its native 12V-2×6 cable is rated for the card’s requirement and is listed for that PSU revision.
- Check that the case has enough room beside the GPU for the connector’s required straight run and bend.
- Check the PSU length and cable compartment with the drive cage and radiator installed.
A unit can therefore have the right wattage and still be unsuitable because the approved cable is missing, the implementation tested poorly, or the case forces a dangerous bend.
If the card uses a supplied multi-8-pin adapter, populate every required input exactly as its instructions specify. Do not leave one disconnected because the system appears to boot. Route the source cables without placing tension on the adapter, and use separate PSU cables when required by the GPU/PSU documentation.
Example 2: Card With Three 8-Pin Inputs
Some RX 7900 XTX partner cards and other high-power designs use three conventional 8-pin PCIe inputs. Count cables, device-end connectors, and PSU-side sockets separately. A package listing “six PCIe connectors” may mean three cables with two connectors each rather than six independent cables.

If you want three separate PCIe cables for the GPU and the motherboard uses two EPS CPU cables, the PSU must provide the correct five cable runs and enough approved modular sockets. A combined “CPU/PCIe” label on the PSU does not mean the EPS and PCIe device ends are interchangeable.

Finally, verify whether the second motherboard EPS connection is required for your CPU and settings. It is not universally optional and not universally necessary; the board manual decides. This is a better approach than sacrificing a required GPU cable based on a generic assumption.
Efficiency, Input Power, and Local Conditions
PSU efficiency is the ratio between DC power delivered to the components and AC power drawn from the wall. If a system receives 500 watts at 90% efficiency, wall draw is roughly 556 watts; the difference becomes heat. The PSU does not add its rated capacity to the system’s consumption.
Efficiency varies with load, input voltage, and temperature. Certification can help compare operating cost and heat, but acoustic testing is still necessary because fan curves vary. Also check the unit’s supported AC-input range when building in a region with a different mains standard or using imported hardware.
At high altitude or high ambient temperature, cooling has less margin. Follow any PSU derating guidance and avoid enclosing the intake against carpet or a solid panel. Mount the PSU with access to a filtered intake when the case design provides one, and clean the filter periodically.
Accessory Power and Final Checks
Count the SATA-power connectors required by 2.5-inch drives, hard-drive cages, fan/RGB hubs, AIO pumps, and controllers. Legacy accessories may require a peripheral four-pin connector. Also verify that the cables can physically reach without being stretched across a fan or sharply folded behind the motherboard tray.
Before ordering, perform this final PSU audit:
- The exact PSU model and wattage have a trustworthy professional review.
- Its capacity meets the exact GPU recommendation and complete-system calculation with suitable headroom.
- Its form factor, length, and cable-exit design fit the chosen case layout.
- It includes the required 24-pin, EPS, GPU, SATA, and accessory cables.
- The native or approved GPU cable has the required power rating and enough room for a safe bend.
- No modular cable will be reused from another PSU.
V. Clearance Issues

Compatibility tools are good at matching sockets and basic form factors, but physical fit is more complicated. A graphics card can be shorter than a case’s published limit and still collide with a front radiator. An air cooler can be below the case’s height limit until its front fan is raised over tall RAM. A case can list support for a 360mm radiator without supporting every radiator thickness in every mounting position.
Treat clearance as a three-dimensional, configuration-dependent problem. Verify the exact dimensions of the products you will buy, not the dimensions of a reference design, an adjacent model, or another revision with a similar name.
The four most common clearance checks are:
- Graphics-card length, height, thickness, and power-cable space
- Air-cooler installed height versus case depth
- RAM height under the CPU cooler and its front fan
- AIO radiator length, width, total thickness, and mounting-position restrictions
Other possible conflicts include drive cages, PSU length, vertical GPU brackets, fan hubs, side-mounted fans, motherboard heatsinks, and rear-connector motherboards. Draw the intended layout or use the case manual’s configuration diagrams when several large components share the same space.
1. Graphics Card Clearance
Modern graphics cards vary enormously. Two cards built around the same GPU can use completely different printed circuit boards, coolers, power limits, and power connectors. That is why “this case fits an RTX 5090” is not a reliable compatibility statement. You need the dimensions of the exact Founders Edition or partner model in your cart.
Check all of the following:
- Length: from the rear bracket to the far end of the card.
- Height: from the PCIe edge connector/bracket area toward the side panel. Tall cards need additional room for the power connector.
- Thickness: in millimeters and occupied slots. “Three-slot” and “3.5-slot” are not precise substitutes for a measured thickness.
- Power-cable clearance: space to fully seat the 8-pin or 12V-2×6 plug and begin a gradual bend without side-panel pressure.
- Support hardware: room for an anti-sag bracket, brace, or vertical-mount riser if the card requires one.
NVIDIA’s reference GeForce RTX 5090 Founders Edition specifications, for example, list a 304mm length, 137mm height, and 61mm thickness, plus additional planning space for the power cable. Partner RTX 5090 cards can be substantially larger, so those reference dimensions cannot be used for every RTX 5090.
Step 1: Read the Exact Card’s Mechanical Specification
Use the card manufacturer’s product page or manual and copy its length, height, thickness, slot count, connector position, and recommended support method. Retail listings often combine several variants or reuse images. Search the complete model number, including suffixes such as OC, Master, Gaming, or Suprim.
The older Gigabyte AORUS RTX 4090 Master remains a useful extreme-size example because it measures approximately 358.5mm long, 162.8mm tall, and 75.1mm thick. It illustrates why checking only GPU family is unsafe.

Step 2: Check the Case in the Intended Configuration
The case’s “maximum GPU length” is frequently a best-case number. Read its footnotes and layout diagrams for reductions caused by:
- front fans or a front radiator;
- side radiators or fan brackets;
- installed hard-drive cages;
- a reservoir or pump mount;
- vertical mounting hardware; and
- a different PSU or motherboard-tray position.
If the case gives only one maximum length, do not subtract a radiator thickness and declare victory unless the manual shows that the parts occupy the same plane. Fan frames, radiator end tanks, fittings, and front-panel brackets can create local obstructions that a simple subtraction misses.
Corsair’s 4000D Airflow specifications, for instance, list up to 360mm of GPU clearance, but a front radiator or other front-mounted hardware consumes some of that space. A 358mm card is therefore not a safe match merely because 358 is less than 360.
Legacy Example: Phanteks P400A
The original version of this guide used the Phanteks P400A to demonstrate configuration-dependent clearance. Its documentation listed a generous maximum GPU length but a much shorter allowance when optional hard-drive brackets were installed.

That lesson remains current even if you choose another case: always compare dimensions using the final arrangement, not the case’s largest marketing number.
Compact-Case Example
A compact case can support a “triple-slot GPU” and still reject a particular card because it is too tall, too thick, or too long. The original Cooler Master NR200P, for example, advertised support for cards up to roughly 330mm in the appropriate configuration. That is not enough for the 358.5mm AORUS card, and the AORUS model also exceeds other dimensional limits found in compact layouts.

Case revisions matter. An NR200P, NR200P V2, and similarly named regional variant may not use the same layout. Match the case’s full name and revision when reading a build log.
Power Connector and Side-Panel Clearance
The GPU can fit while its power cable does not. Add the card’s height to the cable maker’s required straight-run/bend clearance and compare that combined requirement with the space to the side panel. A glass panel that closes only by pressing hard on a 12V-2×6 connector is not an acceptable fit.
This is particularly important for tall partner cards in relatively narrow cases. A 90-degree cable or adapter is safe only if the PSU and GPU manufacturer explicitly approve that exact product, orientation, and rating. Do not solve a clearance problem with an unverified adapter.
Thickness, Bottom Fans, and Vertical Mounts
A thick card can cover several motherboard slots and sit close to a PSU shroud or bottom intake fans. Leave enough space for airflow; “it can be screwed into the case” does not mean the cooler can breathe.
A vertical mount changes the calculation. Verify:
- the case supports the bracket and exact card thickness;
- the cooler will not sit against the side panel;
- the PCIe riser supports the required generation or can be configured reliably in the BIOS;
- the riser and bracket do not block other cards or bottom fans; and
- display cables can reach the recessed outputs.
Graphics-card clearance checklist:
- Exact card length, height, measured thickness, and slot count.
- Case limits in the final fan, radiator, drive-cage, and PSU configuration.
- Enough side-panel room for a fully seated, gently routed power cable.
- Enough room for airflow and the supplied anti-sag support.
- Any vertical bracket and riser validated separately.
2. Air CPU Cooler Clearance (Height)
For a tower air cooler, compare its installed height with the case’s maximum CPU-cooler height. Then check whether the installed height changes when a fan is moved upward to clear the memory.
The basic comparison is simple:
Installed cooler height < case CPU-cooler limit
But do not design around a zero-millimeter margin. Manufacturing tolerances, motherboard position, socket hardware, panel lining, and fan adjustment can consume a small paper margin.
Example: Noctua NH-D15
Noctua’s original NH-D15 is a useful example because its dimensional drawing lists a nominal 165mm height with fans. Raising the front fan over taller memory increases the installed height further. Use Noctua’s current case compatibility center for the exact case rather than relying on a retailer table.

The Corsair 4000D Airflow lists a 170mm maximum CPU-cooler height. On paper, that leaves only a small margin for a dual-fan NH-D15. If the front fan must be raised several millimeters, the combination can exceed the case limit even though both product pages appear compatible when read separately.

By contrast, a case with a 160mm limit cannot house an NH-D15 at its intended height.

Other Air-Cooler Conflicts
Height is not the only dimension. A wide dual-tower cooler can:
- overhang the RAM slots;
- touch a tall VRM or M.2 heatsink;
- block the first PCIe slot on a compact motherboard;
- conflict with a rear exhaust fan; or
- make the graphics-card latch difficult to reach.
Check the cooler maker’s motherboard compatibility database when one exists. Also decide whether the cooler can be installed with the motherboard already in the case or whether access to the rear backplate is required.
Do not remove a heat-pipe cap, bend a tower, or run the case without its side panel as a permanent “fix.” Choose a cooler that fits the intended enclosure.
3. RAM Height Clearance

Large air coolers often overhang one or more DIMM slots. Low-profile modules may fit under the heatsink or front fan; tall heat spreaders and RGB light bars may not.
RAM clearance is a three-part calculation:
- Find the memory module’s exact height.
- Find the cooler’s clearance in the fan configuration you will use.
- If the fan must move upward, add that movement to the cooler’s installed height and compare the result with the case limit.
NH-D15 Example
Noctua’s NH-D15 documentation lists 32mm of RAM clearance in its standard dual-fan arrangement. Removing the front fan provides much more room, and raising that fan can clear taller modules, but each millimeter of upward movement adds approximately one millimeter to the cooler’s total height.
Suppose a memory kit is 40mm tall. The front fan would need roughly 8mm more space than the 32mm standard clearance. A cooler with a nominal 165mm height could then require about 173mm. That will not fit a case limited to 170mm.
This is why “NH-D15 fits the 4000D” and “NH-D15 supports 40mm RAM when the fan is raised” cannot be evaluated as separate claims. The three components must be checked as one assembly.
The safest options are:
- choose low-profile memory;
- use the cooler in a manufacturer-approved single-fan configuration if its performance remains adequate;
- choose a cooler with an offset or cutout designed for tall RAM; or
- choose a wider case that allows the fan to be raised.
Do not assume that removing decorative RAM heat spreaders is safe or warranty-neutral. Buy modules whose published height works with the cooler.
How to Research an Unspecified Clearance
If the cooler maker does not publish a RAM limit, look for a technical drawing, motherboard-compatibility database, or official support response. User build photos can provide additional evidence, but match all relevant details: cooler revision, fan size, RAM model, motherboard slot position, case, and orientation.
A photo showing that two parts were assembled does not prove the side panel closes, the fan is centered on the tower, or all DIMM slots remain usable. Use build reports as a cross-check, not as a replacement for specifications.
4. AIO/Radiator Clearance

A case’s claim that it supports a “360mm radiator” means it provides mounts for three 120mm fans in at least one position. It does not mean that every 360mm AIO will fit with every motherboard, RAM kit, GPU, drive cage, and fan arrangement.
The size in an AIO’s product name describes its fan class, not its exact outside dimensions. A nominal 360mm radiator is longer than 360mm because it needs end tanks and fittings. Likewise, a 420mm radiator is longer than 420mm.
Check these measurements:
- Radiator length and width: the complete outside dimensions, including end tanks.
- Radiator thickness: not including the fans unless the maker explicitly says otherwise.
- Fan thickness: normally about 25mm, but not universal.
- Total stack: radiator plus fans, screw heads, vibration pads, and any required clearance for fittings.
- Tube length and exit direction: enough to reach the CPU block without a kink or severe pull.
Current Thick-Radiator Example: Arctic Liquid Freezer III
Arctic’s Liquid Freezer III 360 specification sheet lists a 398 x 120 x 38mm radiator and 25mm-thick fans. Before allowing for screw heads or local obstructions, the radiator-and-fan stack is approximately 63mm thick.
The Liquid Freezer III 420 uses a 458 x 138 x 38mm radiator and thicker 140mm-class fans, producing a stack of roughly 65mm. These are substantially thicker assemblies than many cases assume in their most optimistic diagrams.

Top-Mount Clearance
A top radiator and its fans can collide with:
- the motherboard’s VRM heatsink or integrated I/O cover;
- tall RAM modules;
- the CPU EPS cables at the top edge;
- a rear exhaust fan; or
- the front radiator’s end tank in a dual-radiator build.
The Lian Li LANCOOL III is a good example of unusually detailed documentation. It lists up to 75mm of total thickness for a top radiator assembly, but also places a 44mm RAM-height condition on certain top-mounted 280mm/420mm configurations. An approximately 65mm Liquid Freezer III 420 stack appears to fall within the thickness allowance, yet you must still check memory height, motherboard heatsinks, fittings, and the exact mounting offset.

The Lian Li O11 Air Mini provides another useful configuration lesson. Its motherboard tray can be arranged in different slot modes, and top-radiator support changes with that arrangement.


Front-Mount Clearance
A front radiator can avoid RAM and VRM conflicts, but it consumes GPU length and can interfere with the PSU shroud or hard-drive cage. Confirm whether the radiator’s tubes and end tanks can be oriented without hitting the card.
Do not assume that moving a top radiator to the front solves every problem. Recalculate:
- remaining graphics-card length;
- clearance between the GPU power cable and side panel;
- drive-cage and PSU-cable space;
- tube reach around the GPU; and
- airflow direction and dust filtration.
If the radiator is front-mounted and the pump is in the CPU block, keeping the radiator’s highest point above the pump helps prevent air from collecting in the pump. Follow the AIO manufacturer’s orientation instructions; designs with the pump in the radiator or tubing can have different requirements.
Bottom and Side Mounts
A bottom mount can place the pump at the top of a loop when the pump is integrated into the CPU block, which is generally undesirable. Use a bottom position only when the cooler manufacturer supports that orientation for the model’s pump location.
Side mounts in dual-chamber cases introduce their own limits. A radiator that fits with fans in the main chamber may not fit with fans behind the tray, or vice versa. Fittings can conflict with a top radiator, and a thick assembly can reduce GPU width or cable space.
How to Validate an AIO Combination
Use this order:
- Read the exact case manual and choose a mounting position.
- Record the maximum radiator length, width, and total thickness for that position.
- Record the AIO’s complete radiator dimensions and fan thickness.
- Apply every case-layout condition for motherboard size, RAM height, storage cages, and GPU length.
- Check tube reach, fitting position, fan direction, and required headers.
- Search for a completed build using the same case, AIO, motherboard, RAM, and GPU as a final visual cross-check.
Build photos are valuable because manufacturers cannot test every combination, but specifications and manuals remain the primary evidence. A user may have modified a bracket, omitted a fan, used slim fans, or left a panel open.
Make a Clearance Worksheet
For a complex build, create one row for each shared space and record both the limit and the planned use. Useful rows include:
- GPU length available with the chosen front fan/radiator and drive-cage position;
- GPU height plus power-connector bend room to the side panel;
- GPU thickness plus clearance to bottom fans or the PSU shroud;
- air-cooler height after any RAM-related fan adjustment;
- top radiator-plus-fan thickness versus RAM and VRM height;
- front radiator stack versus GPU and drive-cage space; and
- PSU length plus modular plugs versus the cable compartment.
Use millimeters throughout so you do not introduce rounding errors between inches and metric specifications. Label every number with its source URL and product revision. If a manufacturer omits a needed dimension, ask support or choose a combination with better documentation rather than assuming a fit from a photograph.
Leave a practical margin where possible. A nominal 1mm gap may disappear because a panel bows inward, a cable exits at an angle, or the published limit excludes a bracket. More margin also makes assembly, cleaning, and future upgrades easier.
Complete Pre-Purchase Compatibility Audit
Before placing the order, create a table with the exact manufacturer part number for every component and complete this final audit:
- CPU and motherboard: socket, CPU support list, required BIOS version, and an available update method.
- Memory: DDR generation, desktop form factor, capacity, module count, support-list evidence, profile, and cooler clearance.
- Graphics card: length, height, thickness, slot count, power connectors, PSU recommendation, and case/cable clearance.
- CPU cooler: socket bracket, CPU suitability, installed height or radiator stack, motherboard clearance, and headers.
- Case: motherboard size, PSU form factor/length, GPU dimensions, cooler limit, radiator layout, storage mounts, and front-panel headers.
- Storage: M.2 protocol/length, lane sharing, SATA ports, drive mounts, and heatsink arrangement.
- Power supply: reviewed exact model, adequate capacity, correct cables, safe GPU-cable routing, and no reused modular cables.
Then download or bookmark the current manuals and support pages. Product listings can change or disappear after you order; having the manuals available makes assembly and troubleshooting much easier.
It’s Time to Build…
Once you’ve chosen your components, you’ll next need to learn how to assemble all of your parts into a working computer. There are a ton of excellent build guides on the internet to help you out.
We have one you can use here:
How to Build a Gaming PC (Step-by-Step Guide)
If you’ve made it all the way through this guide, you have the process you need to choose and verify your components. Have fun choosing the parts for your build—and perform one last exact-model compatibility check before you order.
Get Help: We’ve tried to cover the entire scope of choosing components for a gaming PC build. However, it is such a broad topic that we have likely missed some information. If you have a question, or you want to point out something we should have included, please let us know in the comment section below.
