 Need to record your screen on Windows 11 or Windows 10? In this guide, we’ll walk through four easy and reliable ways to capture your display—using built-in tools and popular third-party software.
Whether you’re recording a tutorial, capturing gameplay, creating work presentations, or sharing content online, screen recording is one of the most useful features you can have on a PC. Fortunately, both Windows 11 and Windows 10 offer multiple ways to record your screen—many of them free and already installed.
You don’t need expensive software or specialized hardware to get started. Depending on what you’re recording (games, apps, full desktop, or browser windows), one method may be better suited than another.
Below are four of the most reliable ways to record your screen on Windows 11 and Windows 10.
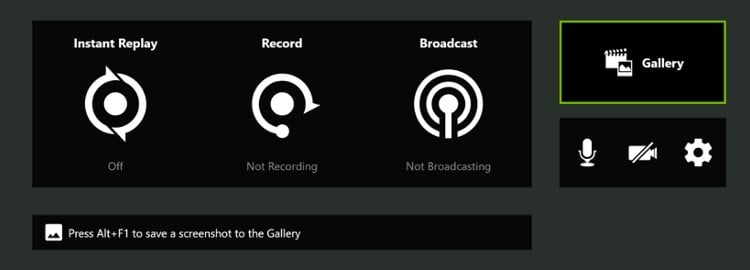
1. Record Your Screen Using Xbox Game Bar (Built-In)
Both Windows 11 and Windows 10 include a built-in screen recording tool called Xbox Game Bar. Despite the name, it works for more than just games—you can record apps, browsers, and many desktop programs.

Xbox Game Bar is built into Windows 11 and Windows 10 and provides a quick way to record your screen.
How to use Xbox Game Bar:
- Open the app or window you want to record.
- Press Windows + G to open Xbox Game Bar.
- In the Capture widget, click Start Recording or press Windows + Alt + R.
- Press the same shortcut or click Stop when finished.
Your recordings are automatically saved to:
- Videos → Captures (MP4 format)
Important limitations:
- You can’t record the full desktop or File Explorer.
- Advanced editing features are not included.
- Some older systems may not support hardware encoding.
System requirements: Your PC must support one of the following GPU encoders:
- AMD VCE / VCN
- Intel Quick Sync
- NVIDIA NVENC
If Game Bar doesn’t open, make sure it’s enabled under Settings → Gaming → Xbox Game Bar.
2. Record Your Screen with Third-Party Software (OBS, FlashBack)
If you want more control over video quality, audio sources, or plan to stream live, third-party software is the way to go.
Two popular options are:
- OBS Studio (free, open-source)
- FlashBack Express (free with optional paid upgrades)

OBS Studio gives you full control over recording quality, audio sources, and screen regions.
Using OBS Studio (basic setup):
- Install OBS and launch the program.
- Create a new Scene.
- Add a Source (Display Capture, Window Capture, or Game Capture).
- Go to Settings → Output and confirm your recording location.
- Click Start Recording and Stop Recording when finished.
Why choose OBS?
- Excellent video quality control
- Multiple audio tracks
- Streaming support (Twitch, YouTube, etc.)
FlashBack is easier for beginners and allows you to record full screen, windows, or selected regions with minimal setup.
3. Record Your Screen with the NVIDIA App (In-Game Overlay)
If your PC uses an NVIDIA graphics card, you can record your screen using the built-in capture tools included in the NVIDIA App. This app has replaced GeForce Experience and provides the same ShadowPlay-style recording features with a more modern interface.
The NVIDIA App includes an in-game overlay that allows you to record gameplay and desktop activity with minimal performance impact.
How to record your screen using the NVIDIA App:
- Download and install the NVIDIA App.
- Sign in with your NVIDIA account.
- Open the NVIDIA App and go to Settings.
- Enable In-Game Overlay.
- Press Alt + F9 to start or stop recording.
Recorded videos are saved to your Videos folder by default, and you can customize quality, resolution, and audio settings directly within the NVIDIA App.
This method is especially popular for gaming because it uses NVIDIA’s hardware encoder (NVENC), which allows you to record high-quality footage with very little impact on game performance.
4. Record Your Screen with AMD Software (ReLive)
If you’re using an AMD graphics card, AMD offers its own built-in recording tool through AMD Software: Adrenalin Edition.

How to enable AMD screen recording:
- Right-click your desktop and open AMD Software.
- Go to Settings → Record & Stream.
- Enable screen recording and assign hotkeys.
- Use your hotkey to start and stop recording.
Like NVIDIA’s solution, AMD’s recording feature uses hardware encoding and saves videos to your Videos folder.
Which Screen Recording Method Is Best?
Here’s a quick breakdown:
- Quick recordings: Xbox Game Bar
- Tutorials / streaming: OBS Studio
- NVIDIA GPU owners: NVIDIA In-Game Overlay
- AMD GPU owners: AMD Software ReLive
Each option has its place, and the best choice depends on how much control you need and what you’re recording.
Final Thoughts
Recording your screen on Windows 11 or Windows 10 doesn’t have to be complicated. For most users, built-in tools are more than enough to get started. If you want more control or higher production value, third-party software and GPU-based recording tools offer powerful alternatives.
No matter which method you choose, once you’ve recorded a few clips and dialed in your settings, screen recording quickly becomes second nature.