 A quick guide to help you find out what specs your PC has.
If you’re planning on upgrading your computer, fixing a problem with your system, or just want to know what you’re working with, you may need to check your PC’s specs. Fortunately, you don’t have to open up your system or download anything complicated to find out what parts you have.
Windows gives you a few different ways to quickly check your system’s main components like its processor, graphics card, memory, and storage. In this guide, we’ll show you the easiest ways to find your specs, along with a few tools you can use if you want even more detailed information.
Whether you’re trying to figure out if an upgrade makes sense or you just want to know exactly what’s inside your machine, we’ve got you covered.
The easiest way to check your computer’s hardware is by using one of these built-in Windows tools:
- System Information: Type ‘system’ into the Windows search bar and hit Enter. This shows your CPU, RAM, Windows version, GPU (under Components > Display), and motherboard info (on newer systems).
- About Your PC: Type ‘about’ into the Windows search bar and hit Enter. This displays your CPU, memory, and Windows version.
- Task Manager: Type ‘task’ into the Windows search bar and hit Enter. Then switch to the Performance tab to view your CPU, memory (including speed), and GPU information.
Table of Contents
Step-By-Step Video Tutorial

Quick Comparison: Where to Find Your PC Specs in Windows
| Tool | CPU | GPU | RAM | Storage | Motherboard |
|---|---|---|---|---|---|
| System Information | ✅ | ✅ | ✅ | ❌ | ✅ |
| About Your PC | ✅ | ❌ | ✅ | ❌ | ❌ |
| Task Manager (Performance Tab) | ✅ | ✅ | ✅ | ❌ | ❌ |
| Device Manager | ❌ | ✅ | ❌ | ✅ | ❌ |
Additionally, you can check each individual component in your system using the steps provided below.
How to Check Your CPU
If you’re wondering what kind of processor you have, you can easily find out that information on a Windows 11 (or older) computer in two clicks.
Check Your CPU in System > About
To find out what CPU you have, simply do the following:
- Type ‘about’ in the Windows search bar and hit enter.
- Next to ‘Processor’ it will list what kind of CPU you have in your computer.

Easy, right?
How to Check Your Graphics Card
To find out what kind of graphics card you have, there are a few different methods you can use. If you need to find out the specific model of graphics card you have, use GPU-Z and the third method below.
Check Your GPU in Task Manager
To quickly find out what GPU you have, do the following:
- Type ‘task’ in the Windows search bar and hit enter.
- In Task Manager click on Performance on the left-hand menu (second option down).
- Your GPU will be listed here.

Check Your GPU in Device Manager
You can also find out what GPU you have through Device Manager:
- Type ‘device’ in the Windows search bar and hit enter.
- In ‘Device Manager’ click on the arrow next to ‘Display Adapters’
- Your GPU will be listed there.

If you’re checking via Device Manager, it should be noted that it might show two options under the ‘Display Adapters’ tab. If it shows two options, that means it is showing both the integrated graphics on your processor and the dedicated graphics card on your laptop.
The one that you are looking for is the dedicated graphics card, as it is the more powerful (and the one your system uses) of the two.
And your dedicated graphics card will typically be the second option listed. If you have an Intel processor, the integrated graphics will be named something like ‘Intel HD Graphics 4000.’ Or, if you have an AMD processor that has integrated graphics, it will be something like ‘AMD Radeon(TM) Vega 11 Graphics.’ In that case, it will not be those options you want, but the other option is the GPU your system uses.
Also, if you have a dedicated graphics card, neither of the above-mentioned will show you what specific graphics card model you have. Unfortunately, the only way to check that is to open up your system, remove your graphics card, and look for the brand and model number. The brand will likely be visible enough, but the specific model number will probably be listed somewhere on the back of the graphics card on a sticker.
Some third party tools like GPU-Z can give you this specific information, though.
Check Your Specific Graphics Card Model With GPU-Z
Here’s how you can check exactly what graphics card model you have using GPU-Z:
- Download GPU-Z from TechPowerUp.
- Open GPU-Z.
- This will show you what GPU you have and who manufactured it. In my case, it’s a Gigabyte RTX 2060.
- Click ‘Lookup.’
- This will open a webpage that will tell you exactly what model your graphics card is.

How to Check Your Motherboard
To find out what type of motherboard you have, who manufactures it, and what socket and chipset it is, the process is a bit different than it is to check other components in your system.
Check Your Motherboard By Looking At It
You could of course open up your desktop (if you have a desktop and not a laptop) and check and see who manufactures your motherboard and what the model name is on the board.
Motherboards are typically named something like ASUS Z790-P, or MSI B550M, or Gigabyte GA-AX370-Gaming5, where ASUS, MSI, and Gigabyte are motherboard manufactures, and Z790, B550, and X370 are the motherboard chipsets (which can also lead you to the socket type of the motherboard as well.)

So, if you’re not somewhat familiar with who the main motherboard manufacturers are and what string of letters and numbers to look for that designate the chipset and motherboard name, you might want to go with an easier option.
Check Your Motherboard With System Information
For some users, you can try the following:
- In the Windows search bar, type in ‘System Information.’
- Scroll down on the System Summary tab (opens on the left side of the window) until you find ‘Motherboard Manufacturer’, or ‘BaseBoard Manufacturer.’
- The information next to ‘Motherboard/BaseBoard Manufacturer’, ‘Motherboard/BaseBoard Model’, Motherboard/BaseBoard Name’, and/or ‘BaseBoard Product’ should give you the information you are looking for.

Although, in a lot of cases, the information you’ll find in these tabs will be vague. For instance, on my older desktop, the BaseBoard Manufacturer is ‘ASUSTek COMPUTER INC.’, the BaseBoard Model is ‘Not Available’, and the BaseBoard Name is ‘Base Board’.
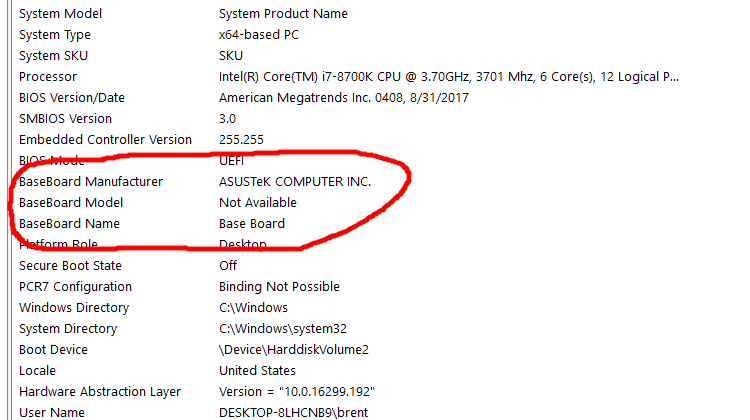
It’s not really a whole lot to go off of, but it does at least let you know who manufactured your motherboard. And, it could help make it easier to find the information you’re looking for when you open up your computer to check.
Also Read: What Motherboard Do I Have?
How to Check Your RAM
Checking how much RAM you have in your computer is another very easy task. In fact, you can find how much memory you have on the same screen that lists what CPU you have.
Check Your RAM in System > About
- Type ‘about’ in the Windows search bar and hit enter.
- In the System > About menu, you’ll see how much RAM you have.

You can also find out how much RAM you have by looking in ‘System Information’ on Windows 11 or older as outlined in the section above on how to find out what type of motherboard you have.
How to Check Your Storage
There are a couple of ways that you can use to check how much storage you have and what specific storage device is in your PC.
Check How Much Storage Remaining You Have
To see how much storage you have, as well as how much storage space you have used in your system, do the following.
- Open File Explorer (the folder icon) or type ‘file’ into the search bar and hit enter.
- Find Local Disk (usually C:) on the left-hand menu.
- Right-click Local Disk and hit Properties.

In properties, you can see what your system’s total storage capacity is, as well as how much space you’ve used and how much free space you have left.
However, if you’re looking to sell your PC and you want to include how much storage capacity your system has, the total capacity listed under your drive’s properties is going to be a bit misleading.
In my case, it shows I have 1.86TB capacity. Obviously, there are no 1.86TB drives available to purchase. Since I know that I have a 2TB drive, I know that that number is off. If I were going to sell this PC, I wouldn’t say that it has a 1.86TB drive. That would likely be confusing to more knowledgeable buyers.
Check Your Storage Device Model Number in Device Manager
To find out the manufacturer’s listed capacity for your storage device, you can try using device manager.
- Type ‘device’ into the Windows search bar and hit enter.
- In Device Manager click on the arrow next to ‘Disk drives.’
- This will list your device drive, in my case it is KINGSTON SKC3000D2048G.
- Search for the drive that shows up in Device Manager in Google.

In my case, this pulls up results for the KC3000 PCIe 4.0 2TB NVMe M.2 SSD, which I know is correct. This may not work for everyone, but if you’re having trouble determining your specific storage device, this would be the best way to do so, outside of opening up your computer or laptop and checking.
Third Party Tools to Check Your PC Specs
While the methods above will easily allow you to check your computer’s specifications, you can also use third-party hardware monitoring tools to help you find necessary info about your system.
We recommend the following tools to help you monitor you computer’s performance, as well as give you information (like what CPU and GPU you have, as well as how much RAM you have):
- Crucial System Scanner
- CPU-Z
- GPU-Z
- Speccy
- Core Temp (CPU only)
- HWInfo
- MSI Afterburner
How to Check Specs of A Laptop?
While this post might seem more geared towards people who have desktop computers, the methods outlined above will work for laptop owners as well.
If you’re a laptop owner and you’re looking for more information on your laptop’s configuration, check out the following guide: What Kind of Laptop Do I Have?
After You Check What Computer Specs You Have…
Now that you know what specs your computer has you can make a better decision on whether or not your current system is worth upgrading or not. However, it should be noted that if you are looking to upgrade your components, it isn’t as simple as just picking out a new and better component and putting it into your system.
Your existing components will determine which new components you can upgrade to. For instance, if you have an older motherboard, you can’t simply go out and upgrade to the newest processor, because your motherboard and the newest processor likely aren’t compatible.
You also can’t go out and upgrade your graphics card to the biggest and best option available if your existing power supply doesn’t have enough power supply to accommodate the new GPU.
In fact, in a lot of cases, if you have an older system, it might make more sense to just buy or build a brand new system, as your older system might not have any components worth keeping around. If that’s the case, check out our buyer’s guide on buying/building a cheap PC, or if you want to spend more, our buyer’s guide on buying/building a high-end computer.